Updated April 2025: Stop these error messages and fix common problems with this tool. Get it now at this link
Many users encounter the error message “Not enough quota to process this command” when they try to copy a file from their computer to a network folder. In most cases, the error message is accompanied by error code 0x80070718. This problem is known to occur in Windows 7, Windows 8.1, and Windows 10.
Table of Contents:
What is the cause of error 0x80070718 “Not enough quota available to process this command”?

According to user complaints, the most common cause of this problem is a low disk usage limit that cannot handle shared files. Error 0x80070718 can also occur if the default storage location is set to SSD.
In this case, the problem can be solved by changing the location on the hard drive. If the files or folders involved in the shared location are corrupted, the Not enough quota to handle this command error may appear.
How to resolve the error 0x80070718 ‘Not enough quota to process this command’?
This tool is highly recommended to help you fix your error. Plus, this tool offers protection against file loss, malware, and hardware failures, and optimizes your device for maximum performance. If you already have a problem with your computer, this software can help you fix it and prevent other problems from recurring:
Updated: April 2025

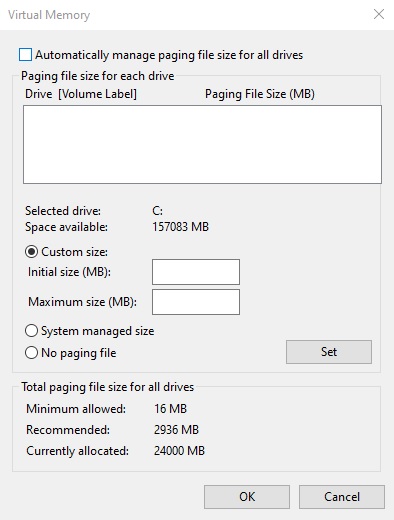
Change the swap file size in the virtual memory settings
- Open the Control Panel, set the display of small icons, then click System.
- Click on Advanced System Settings, then click the Advanced tab.
- Click on Settings under Performance.
- In the Performance Options window, click the Advanced tab, then click Change.
- Uncheck the “Automatically manage swap file size for all drives” box.
- Select Custom Size, enter an initial size (you can enter the recommended page size and maximum size (a value greater than the initial size).
- Click Set and OK to save your changes.
- Restart your computer and see if the error has been corrected.
Change the default save location
- Press Windows + R to open the Run dialog box.
- In the text box, type ms-settings:savelocations and press Enter to open the Default Locations window of the Settings application.
- Change the default storage drive from an SSD to a traditional hard disk drive.
- Use the drop-down menu associated with each type of folder in the Default Locations window.
- Click the Apply button for each folder whose default location has been changed.
- Restart your computer and see if the problem is resolved.
Changing disk usage settings
- Type Control Panel in the search box, then click Control Panel.
- Set the display to small icons, then click Sync Center.
- Click Manage Offline Files to open the Offline Files window.
- Click the Disk Usage tab, then click Change Limits.
- Drag the sliders to increase the maximum storage space that all offline files can use and the maximum storage space that temporary files can use.
- Then click OK to save your changes.
- Click Apply and OK in the Offline Files window, then close it.
- Restart your computer and see if the error persists.
APPROVED: To fix Windows errors, click here.
Frequently Asked Questions
How to resolve error 0X80070718?
- On the taskbar, right-click the Sync Center.
- Select Open Sync Center.
- In the left column, click Manage Offline Files, which will open a new window.
- Click the Disk Usage tab.
- Increase your hard drive's limit size.
How do I troubleshoot an insufficient quota?
- Close the applications.
- Change the default storage location.
- Change the hard disk usage settings.
- Change the paging file size in the virtual memory settings.
How do I repair error code 0x80070718?
- Change the limit values on the Disk Usage tab.
- Change the default storage location.
- Restore Windows files and folders.
- Remove the quota limits from the disk.
What does the “Not enough quota” message mean on your computer?
If the error message "Not enough quota for this command" appears on your computer screen, it means that there is not enough quota left on your hard drive to perform this operation. Open your computer's control panel and look at the small or large icons. Click on Sync Center. Click on Manage Offline Files.