- Download and install the software.
- It will scan your computer for problems.
- The tool will then fix the issues that were found.
This article explains how to fix the Windows 11 installation assistant error code 0x8007007F. If you encounter this problem while installing Windows 10, it might be caused by corrupt registry files. In such cases, you can use the following steps to repair the error.
Table of Contents:
What is installation assistant error 0x8007007f?
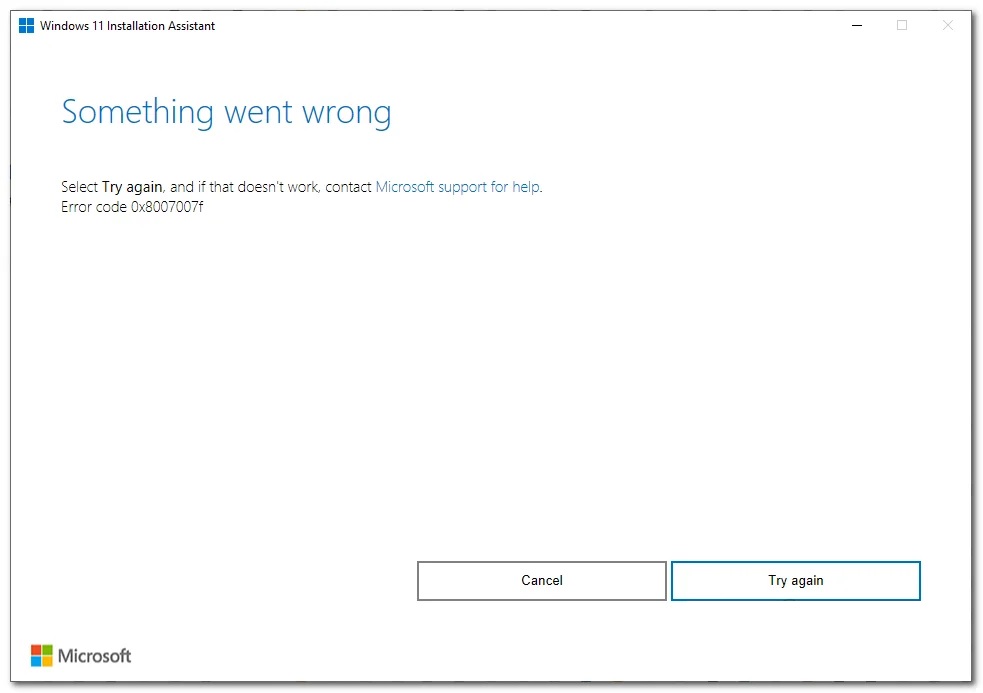
The Windows 11 installation assistant displays a blue screen of death during the setup process. If you are experiencing this issue, it might mean that there is a problem with your hardware. You can use the following steps to troubleshoot the issue.
What are the causes for error 0x8007007f when using Windows 11 installation assistant?
Error 0x8007007F occurs while trying to install Windows 10. This error usually happens because of insufficient administrator permission to run the Windows installation assistant or corrupted system files. You might face this issue if you try to update your PC to Windows 10 from Windows 8/8.1. In such cases, it is better to reinstall the OS.
Run the system file checker scan
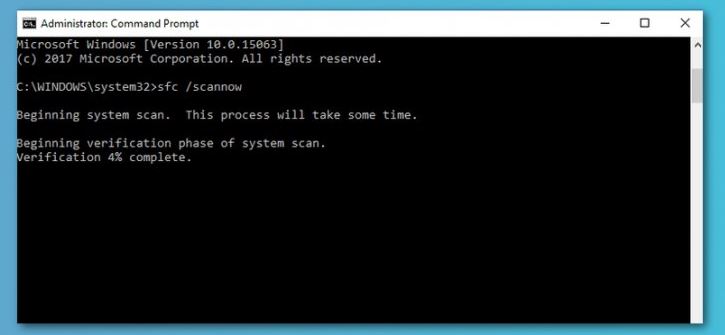
Corrupt system files can cause numerous problems with your computer. If you are experiencing one of these symptoms, it might be time to run a System File Check scan. This tool scans your hard disk drives for corrupted system files. Once you find out what the problem is, you can repair the file and restart your computer without losing data.
A System File Check scan can help identify and fix corrupt system files. When you use Windows Update, Microsoft checks for new versions of important system files every month. However, sometimes, those files become damaged during installation or while downloading. In addition, some programs change system files without telling you about it. These changes could break your operating system.
- If you want to check whether there are any missing system files, download and install the free version of the System File Checker utility.
- Run the program once it finishes installing. You can now select the option to perform a full scan.
- The next screen will show you the status of each file.
- Click on the button labeled “Check Now”. Wait for the scan to finish.
- After the scan completes, you’ll see a list of all the files found to be corrupted.
- Select the ones you want to repair and click on the Repair button.
- When the process ends, reboot your computer and enjoy a clean and stable OS.
Updated: April 2025
This tool is highly recommended to help you fix your error. Plus, this tool offers protection against file loss, malware, and hardware failures, and optimizes your device for maximum performance. If you already have a problem with your computer, this software can help you fix it and prevent other problems from recurring:
- Step 1 : Install the PC Repair and Optimizer Tool. (Windows 10, 8, 7, XP, Vista).
- Step 2 : Click Start Scan to determine what problems you are experiencing with your computer.
- Step 3 : Click Repair Allto resolve all problems.

Start the assistant as an administrator
If you are having trouble installing Windows 10 version 1803, here is what you could do to make it easier. You must run the installation assistant with administrative privileges. This is easy to do.
- Go into the Start Menu and type “Windows Update”.
- Click on the option “Change Settings…” and select “Administrative Templates.”
- Scroll down to the section labeled “User Account Control,” and check off the box next to “Turn User Account Control On or Off.”
- Then, scroll down to the bottom and find the section titled “Installer.”
- Check off the box next to the words “Allow the following programs to be installed without confirmation.”
- Finally, click OK. Now, restart your computer and try again.
Update the graphics drives
When you install Windows 10, it automatically installs the most recent version of Microsoft DirectX, which includes the latest graphics driver. However, if you do not update your graphics driver regularly, the performance of your PC could suffer.
The best way to ensure that your graphics card is working well is to use the manufacturer’s website to download the latest graphics driver. This ensures that you are getting the most up-to-date software.
If you decide to manually download the latest graphics driver, make sure that you check the compatibility list before downloading. You can also try updating your graphics driver using Device Manager. You might also consider upgrading your graphics card.
Turn off the antivirus
Disabling your antivirus is one of the easiest ways to install Windows 11 without worrying about any errors popping up. Most antivirus programs offer some sort of temporarily disabled feature.
You should turn off your antivirus when you are installing Windows 10 because this step is required by the installer. If you have multiple antivirus programs running at the same time, you may need to temporarily disable them in order to complete the installation.
Disable your firewall
Your firewall protects your computer from harmful websites and malware. It can also block certain features of Windows 10. Disabling your firewall allows the installer to work more efficiently.
To disable your firewall:
- Open the Start menu and search for “firewall.”
- Right-click on the Firewall icon and choose Properties.
- Uncheck the box next to Enable firewalls.
- Restart your computer.
Turn On the user account control
User Account Control (UAC) is an operating system security feature that prevents unauthorized changes to computer settings. This article explains how to enable UAC in Windows 10.
To turn on UAC:
- Open the Start Menu and search for “user accounts.”
- Select Change User Account Control settings.
- On the left side of the window, click on the Advanced tab.
- Under the Security heading, uncheck the boxes next to Turn off User Account Control and Do Not Allow apps to change my screen resolution.
- Click OK.
- Reboot your computer.
Set the compatibility mode for Windows
Microsoft offers an installer for Windows 7 or 8 that should work without problems, but some users are reporting that they cannot install Windows 10. In fact, some people even report that they had no trouble installing Windows 10, while others say that they could not complete the process because they encountered errors. This issue seems to affect Windows 10 installations on computers that run on older versions of Windows.
Make sure you select the correct Windows version before running the installation assistant, otherwise you might end up with a system that does not boot properly. If you still experience issues after following these steps and trying to uninstall and reinstall Windows, make sure you set the compatibility mode correctly. Under the heading “Choose Your Options”, choose the option labeled “Advanced Startup Options”. Then under the “Recovery” section, choose “Go Back to Previous Version”.
In both cases, you must restart the computer. There you’ll find a list of compatible modes for each operating system. Click on the “Change settings for my device…” button and select the mode that best suits your needs.
Reboot your computer
If you’re having trouble getting your computer to boot up properly, it might be because of an update or driver. If restarting doesn’t fix the problem, there are other things you can try updating your drivers manually or with the help of a third-party driver updater.
APPROVED: To fix Windows errors, click here.
Frequently Asked Questions
What does error code 0x8007007f mean?
Error code 0x8007007f appears during manual upgrades to Windows 11. According to many Windows 10 users who are facing this issue, the error 0X8007007F would appear while they're trying to use the Windows Installer Upgrade Tool to manually upgrade to Windows 10. During the upgrading process, the App would throw up a warning message, which read: "Something went wrong. Please select try again."
What’s the reason for error 0x8007007f when using Windows 11 installation assistant?
- Insufficient administrator permissions to run the Window installation assistant: This error usually happens because there is no permission given to run Windows Setup Assistant.
- Third-party anti-virus software interferes with upgrade process: As mentioned above, third party antivirus software can interfere with the upgrade process and thus, causing this error.
How can I fix error 0x8007007f?
To fix this error, you can first try rebooting your computer and then reattempting to install the updates. You can also disable your anti-virus software temporarily and then retry updating your computer. In case it still fails, you can try running the System File Checker tool to identify and fix corrupted system files.