- Download and install the software.
- It will scan your computer for problems.
- The tool will then fix the issues that were found.
If you’re having issues with your monitor that keeps disconnecting, you might want to check out our article.
This article explains how to fix your monitor that keeps disconnecting. If none of those apply to you, however, you’ll probably want to try one of the following solutions.
You can change the advanced power settings on Windows 10 to turn off automatic sleep mode. This prevents your computer from automatically powering down when you close the lid. You can also set the screen brightness to 0% or disable the screensaver entirely.
Another way to avoid disconnections is to update your video driver manually or with a third-party program. Drivers allow your PC to communicate appropriately with the components inside. When you install a new version, it usually fixes some bugs and improves overall performance.
Table of Contents:
You should update your drivers
If you are having issues with your computer running slow or freezing up, it could be because your device drivers aren’t working correctly. If you’re wondering how to update them, here’s what you do.
1. Right-click on Start and select Device Manager.
2. In the left pane, locate your display adapter, such as Intel HD Graphics 4000.
3. Expand the menu and select Properties.
4. Click on the Details tab.
5. Now scroll down the list to see if there is an update available for your driver.
The best way to find out is to use our free third-party driver scanner tool that will search for the most recent version of your driver.
Updated: April 2025
This tool is highly recommended to help you fix your error. Plus, this tool offers protection against file loss, malware, and hardware failures, and optimizes your device for maximum performance. If you already have a problem with your computer, this software can help you fix it and prevent other problems from recurring:
- Step 1 : Install the PC Repair and Optimizer Tool. (Windows 10, 8, 7, XP, Vista).
- Step 2 : Click Start Scan to determine what problems you are experiencing with your computer.
- Step 3 : Click Repair Allto resolve all problems.

Set the resolution to something different
1. Right-click your desktop and go into display settings.
2. Choose scale and layout. You might want to change it to something like 1920x1080p.
3. Make sure your monitor and graphics card can handle the new resolution.
4. If you’re having trouble, try lowering the resolution to 1280×1024.
5. If you don’t see the option to change the resolution, make sure your computer meets specific requirements.
Make sure Windows’ power plan is set to high
Windows 10 has introduced a new feature called Power Saver Mode. This mode helps you reduce energy consumption while still allowing you to use your PC.
You can switch between modes like High Performance, Balanced, Battery saver, etc.
You can set the power plan to be high to conserve battery life. To do this, follow these steps:
1. Open the Start menu and type “power.”
2. Click on Power Options.
3. Select Change Plan settings.
4. Choose one of the following options: High Performance, Balanced, or Battery saver.
5. Click Save Changes at the bottom right corner.
6. Close all open programs and restart your computer.
7. Wait until the system boots before opening any programs.
Make sure Windows 10 is updated
Microsoft has announced it will begin rolling out a significant update to Windows 10 on April 11th. This is the most significant change since Microsoft introduced Windows 10 in July 2016. If you haven’t already done so, now is the perfect time to install the latest Windows 10. Here are some tips to help make sure you don’t miss anything important.
1. Check for Updates
Windows 10 includes automatic updates. These updates include fixes for bugs and security issues. There are three options: Download automatically, download later, and notify me. For most people, “Download automatically” is what they want. However, there could be times when you want to wait until a specific date – like when you’re traveling abroad or away from home. In those cases, select either “Notify me” or “Never.”
2. Back Up Your Data
If you’ve been waiting to upgrade to Windows 10, it’s probably because you’re worried about losing data. Don’t worry; we’ll cover how to back up files and folders in just a moment. But first, let’s talk about why backing up is essential.
3. Make Sure You Have Enough Storage Space
You might think that installing Windows 10 requires lots of storage space, but that’s not true. You won’t need anywhere near the free space required to run Windows 7 or 8.1. Instead, you’ll need somewhere around 20GB of disk space.
Verify your internet connection
The Internet is full of stories about people losing access to the web because of a faulty cable connection. But it doesn’t have to happen to you. There are steps you can take to make sure your internet stays up and running.
Checking your connection regularly can help identify potential issues. You’ll want to do this monthly, especially during busy times like the holiday season and major events. If you notice something amiss, don’t panic. Instead, call your ISP and ask what needs to be done. If you’re having trouble getting online, your ISP might be able to fix things for you.
You can also perform some simple troubleshooting yourself. For example, if you’ve noticed intermittent connectivity, try restarting your modem, router, or computer. Or, if you’re experiencing slow speeds, consider upgrading your network equipment.
Another thing to keep in mind is the standard wear and tear of cables. This includes frayed wires or loose connectors. When this happens, you could experience a temporary loss of connectivity. However, if you see signs of damage, contact your ISP immediately.
Finally, there are some basic precautions you can take to ensure your connection stays strong. First, unplug everything except the devices that require power. Then, turn off the lights, TV, stereo, etc., to avoid electrical interference. Finally, use surge protectors to guard against surges caused by storms or power outages.
Run a virus and malware scan
On some occasions, your computer might act weird if it got hit by malware or a virus. These are malicious programs and data that eat up your computer’s memory space, causing performance issues. They make your operating system slow down, preventing Windows applications from working correctly.
If you experience other problems on the machine, such as crashes, freezes, or random errors, it may be a sign that something is wrong with your PC. You can use Malwarebytes to check whether there are any infections on your computer.
A third-party scanner is a free program that scans your entire hard disk for potentially harmful files. In addition to checking for viruses, it will detect adware, spyware, rootkits, and browser hijackers. Once the third-party scanner finishes scanning your system, it will display a list of detected threats along with instructions on how to deal with each one.
To run the full system scan, download a third-party scanner onto your computer and launch it. After starting the program, select ‘Scan Now.’ The program will begin searching your entire hard disk for infected files and automatically clean them out. When the scan completes, the third-party scanner will open a window displaying detailed information about what it found.
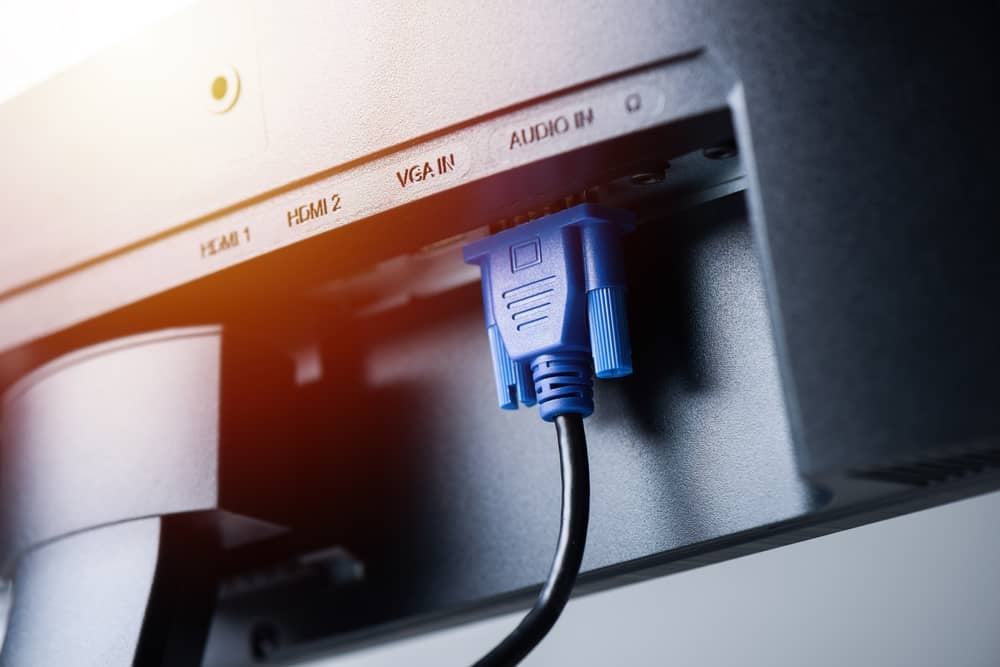
Be sure to inspect your monitor
If you’re having trouble getting your monitor to work with your laptop or PC, there are a few things you might want to check out.
1. First off, make sure you’ve got everything plugged in correctly.
2. If you don’t have a video card installed, try installing one.
3. You’ll probably want to install the latest drivers too.
4. Finally, check to make sure your computer isn’t trying to use both displays simultaneously.
This sometimes happens when you connect your laptop to multiple screens and doesn’t always mean anything is wrong.
Video cable must be relocated
If you’re having issues connecting your monitor to your laptop or PC, it could be because there’s too much noise from the device itself. This is especially true if you’ve got a wireless keyboard or mouse attached to the machine. If you’re experiencing problems like this, try relocating the video cable. You’ll want to move the connection away from the speakers, fans, hard drives, and other devices that might be causing interference.
Revert your display driver to the previous version
If you are having issues connecting your monitor to your computer, it could be because your display driver is out of date. To update your display driver, follow these steps:
1. Start Windows 10.
2. Click the Settings icon.
3. Scroll down to see what version of your display driver is installed.
4. Download and install the latest version of your display driver.
If you’re having issues with your monitor that keeps disconnecting, you might want to check out our article.
This article explains how to fix your monitor that keeps disconnecting. If none of those apply to you, however, you’ll probably want to try one of the following solutions.
You can change the advanced power settings on Windows 10 to turn off automatic sleep mode. This prevents your computer from automatically powering down when you close the lid. You can also set the screen brightness to 0% or disable the screensaver entirely.
Another way to avoid disconnections is to update your video driver manually or with a third-party program. Drivers allow your PC to communicate appropriately with the components inside. When you install a new version, it usually fixes some bugs and improves overall performance.
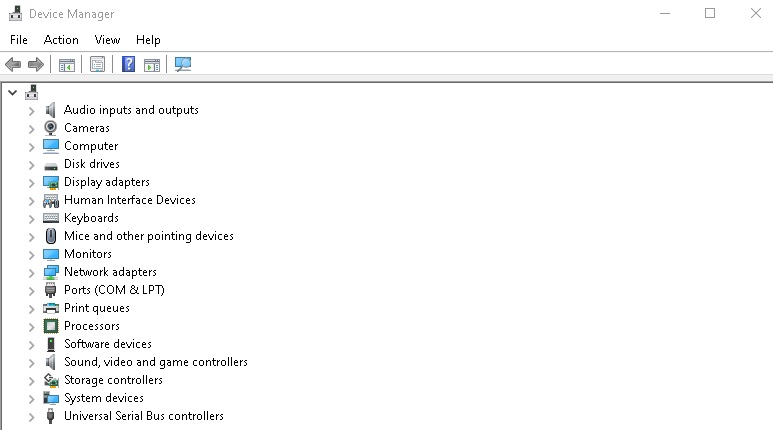
You should update your drivers
If you are having issues with your computer running slow or freezing up, it could be because your device drivers aren’t working correctly. If you’re wondering how to update them, here’s what you do.
1. Right-click on Start and select Device Manager.
2. In the left pane, locate your display adapter, such as Intel HD Graphics 4000.
3. Expand the menu and select Properties.
4. Click on the Details tab.
5. Now scroll down the list to see if there is an update available for your driver.
The best way to find out is to use our free third-party driver scanner tool that will search for the most recent version of your driver.
Set the resolution to something different
1. Right-click your desktop and go into display settings.
2. Choose scale and layout. You might want to change it to something like 1920x1080p.
3. Make sure your monitor and graphics card can handle the new resolution.
4. If you’re having trouble, try lowering the resolution to 1280×1024.
5. If you don’t see the option to change the resolution, make sure your computer meets specific requirements.
Make sure Windows’ power plan is set to high
Windows 10 has introduced a new feature called Power Saver Mode. This mode helps you reduce energy consumption while still allowing you to use your PC.
You can switch between modes like High Performance, Balanced, Battery saver, etc.
You can set the power plan to be high to conserve battery life. To do this, follow these steps:
1. Open the Start menu and type “power.”
2. Click on Power Options.
3. Select Change Plan settings.
4. Choose one of the following options: High Performance, Balanced, or Battery saver.
5. Click Save Changes at the bottom right corner.
6. Close all open programs and restart your computer.
7. Wait until the system boots before opening any programs.
Make sure Windows 10 is updated
Microsoft has announced it will begin rolling out a significant update to Windows 10 on April 11th. This is the most significant change since Microsoft introduced Windows 10 in July 2016. If you haven’t already done so, now is the perfect time to install the latest Windows 10. Here are some tips to help make sure you don’t miss anything important.
1. Check for Updates
Windows 10 includes automatic updates. These updates include fixes for bugs and security issues. There are three options: Download automatically, download later, and notify me. For most people, “Download automatically” is what they want. However, there could be times when you want to wait until a specific date – like when you’re traveling abroad or away from home. In those cases, select either “Notify me” or “Never.”
2. Back Up Your Data
If you’ve been waiting to upgrade to Windows 10, it’s probably because you’re worried about losing data. Don’t worry; we’ll cover how to back up files and folders in just a moment. But first, let’s talk about why backing up is essential.
3. Make Sure You Have Enough Storage Space
You might think that installing Windows 10 requires lots of storage space, but that’s not true. You won’t need anywhere near the free space required to run Windows 7 or 8.1. Instead, you’ll need somewhere around 20GB of disk space.
Verify your internet connection
The Internet is full of stories about people losing access to the web because of a faulty cable connection. But it doesn’t have to happen to you. There are steps you can take to make sure your internet stays up and running.
Checking your connection regularly can help identify potential issues. You’ll want to do this monthly, especially during busy times like the holiday season and major events. If you notice something amiss, don’t panic. Instead, call your ISP and ask what needs to be done. If you’re having trouble getting online, your ISP might be able to fix things for you.
You can also perform some simple troubleshooting yourself. For example, if you’ve noticed intermittent connectivity, try restarting your modem, router, or computer. Or, if you’re experiencing slow speeds, consider upgrading your network equipment.
Another thing to keep in mind is the standard wear and tear of cables. This includes frayed wires or loose connectors. When this happens, you could experience a temporary loss of connectivity. However, if you see signs of damage, contact your ISP immediately.
Finally, there are some basic precautions you can take to ensure your connection stays strong. First, unplug everything except the devices that require power. Then, turn off the lights, TV, stereo, etc., to avoid electrical interference. Finally, use surge protectors to guard against surges caused by storms or power outages.
Run a virus and malware scan
On some occasions, your computer might act weird if it got hit by malware or a virus. These are malicious programs and data that eat up your computer’s memory space, causing performance issues. They make your operating system slow down, preventing Windows applications from working correctly.
If you experience other problems on the machine, such as crashes, freezes, or random errors, it may be a sign that something is wrong with your PC. You can use Malwarebytes to check whether there are any infections on your computer.
A third-party scanner is a free program that scans your entire hard disk for potentially harmful files. In addition to checking for viruses, it will detect adware, spyware, rootkits, and browser hijackers. Once the third-party scanner finishes scanning your system, it will display a list of detected threats along with instructions on how to deal with each one.
To run the full system scan, download a third-party scanner onto your computer and launch it. After starting the program, select ‘Scan Now.’ The program will begin searching your entire hard disk for infected files and automatically clean them out. When the scan completes, the third-party scanner will open a window displaying detailed information about what it found.
Be sure to inspect your monitor
If you’re having trouble getting your monitor to work with your laptop or PC, there are a few things you might want to check out.
1. First off, make sure you’ve got everything plugged in correctly.
2. If you don’t have a video card installed, try installing one.
3. You’ll probably want to install the latest drivers too.
4. Finally, check to make sure your computer isn’t trying to use both displays simultaneously.
This sometimes happens when you connect your laptop to multiple screens and doesn’t always mean anything is wrong.
Video cable must be relocated
If you’re having issues connecting your monitor to your laptop or PC, it could be because there’s too much noise from the device itself. This is especially true if you’ve got a wireless keyboard or mouse attached to the machine. If you’re experiencing problems like this, try relocating the video cable. You’ll want to move the connection away from the speakers, fans, hard drives, and other devices that might be causing interference.
Revert your display driver to the previous version
If you are having issues connecting your monitor to your computer, it could be because your display driver is out of date. To update your display driver, follow these steps:
1. Start Windows 10.
2. Click the Settings icon.
3. Scroll down to see what version of your display driver is installed.
4. Download and install the latest version of your display driver.
APPROVED: To fix Windows errors, click here.