- Download and install the software.
- It will scan your computer for problems.
- The tool will then fix the issues that were found.
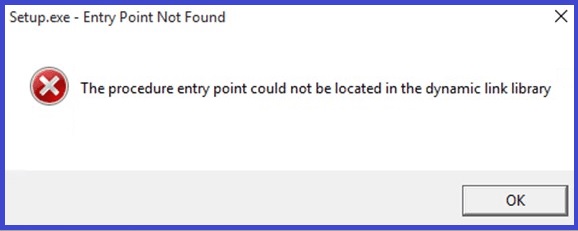
Entry Point Not Found is a common problem among PC users. If you see it, there is no way to launch programs such as Microsoft Office, Chrome, Firefox, Internet Explorer, etc., because the application cannot find the entry point of the executable file. In other words, the program does not know where to start searching for the required information.
The reason behind this issue is usually related to damaged DLL files. These files store essential data about applications and system settings. They are responsible for loading the necessary libraries and functions into memory. When one of the files gets corrupted, the operating system stops working correctly. The most common symptoms include slow performance, frequent crashes, and missing icons.
There are many reasons why DLL files become damaged. Some of them are listed below:
1. Virus attack
2. System crash
3. Hardware failure
4. Software installation issues
This error occurs because there is something wrong with the installation process. In most cases, it happens because you do not install some required files during the setup process. If you see this error, try to fix it manually. You can follow these steps to resolve the issue.
Table of Contents:
Restore your system to a previous state
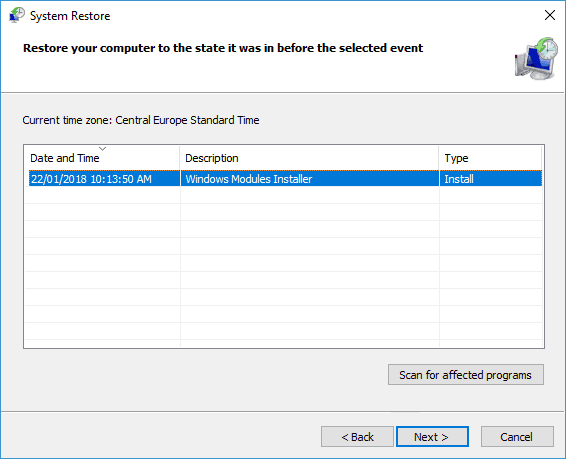
If you are having trouble getting Windows 10 to boot up properly, it could be because you have been infected with ransomware. Ransomware attacks are becoming increasingly common, and many people don’t know how to deal with them. In this article, we’ll show you how to perform a system restore.
1. First thing first, let’s make sure that you’re running the latest security patches. You can do this by opening the Start menu, typing “Windows Update,” and hitting enter. This will ensure that you have the latest security patches installed.
2. Next, open the Control Panel window. Select Programs & Features and scroll down to see what programs are listed. Right-click on each program and choose Uninstall. Do the same for any third-party software you’ve added to your PC.
3. Now, close out of the Control Panel and open the Task Manager. Find the process named svchost.exe and end it. Now, find the process named svchst.exe and end it too. These processes are responsible for starting the operating system.
4. Finally, reboot your PC. When you start it up again, you’ll be prompted to choose whether you’d like to run Windows normally or use Safe Mode. Choose Normal mode and follow the instructions to complete the installation.
5. Once you’re done installing, go into the Control Panel and select Add/Remove Programs. Scroll down to find the program called “System Restore.” Open it and hit Next. Follow the prompts to finish restoring your system. Once you’re finished, restart your PC and try booting it up again. Hopefully, you won’t encounter any issues.
If you still experience problems, you might consider performing a clean install of Windows 10.
Updated: April 2025
This tool is highly recommended to help you fix your error. Plus, this tool offers protection against file loss, malware, and hardware failures, and optimizes your device for maximum performance. If you already have a problem with your computer, this software can help you fix it and prevent other problems from recurring:
- Step 1 : Install the PC Repair and Optimizer Tool. (Windows 10, 8, 7, XP, Vista).
- Step 2 : Click Start Scan to determine what problems you are experiencing with your computer.
- Step 3 : Click Repair Allto resolve all problems.

Use SFC to repair the faulty DLL file
If you are getting error messages while trying to run some programs or games, one possible reason could be that your computer has corrupted system files. In such cases, you might want to use SFC, also known as System File Checker. This tool helps you identify and repair corrupt system files.
Here is a step-by-step process on how to fix the problem:
1. Open the Start menu and type cmd in the Search field. Right-click Command Prompt and select Run as Administrator.
2. When the User Account Control dialog box appears, click Yes.
3. Type sfc /scannow in the command prompt and press Enter.
4. Wait for the scan to complete. Once completed, click OK.
5. Restart your PC.
The problematic app must be reinstalled
If you receive the “Entry Point Not Found DLL Error”, you can also use the following methods to resolve it. You can find out how to fix the problem here.
What you need to do is:
1. Uninstall the problematic app which triggers this issue from your PC.
2. Then, delete the entry point DLL file manually. For Windows 10, you can locate the DLL file under Program Files\WindowsApps\. For Windows 8/8.1, you can locate the folder where the app files are stored.
3. Finally, download and install the problematic app again.
Check your computer for viruses and malware
Sometimes lurking malware or viruses on a computer could throw up the Entry Point Not Found error. This happens because the malicious software tries to access a file it doesn’t have permission to open. Running a full system scan with Windows Defender or another antivirus program can help identify the source of this problem.
If you’re running Windows 10, use Microsoft Security Essentials (MSE), or another free antivirus program, rather than Windows Defender. MSE isn’t nearly as good as Windows Defender, but it does offer some essential protection against the most common threats.
Make sure that the DLL file is installed
If you are having trouble installing the .dll file, you might want to try fixing it yourself. This article explains how to do that. You might need to use third-party tools to find out what files are missing or damaged.
The most common reason for a missing DLL file is that the original developer did not distribute the required software along with the application. So, if you cannot locate the missing DLL file, you might want to try downloading the correct version from another source.
You can search for the missing file on the Internet. For example, you can look up the exact name of the missing file in Google. Or, you can search for the name of the missing file on the website of the manufacturer of the program that uses the missing file.
In some cases, the missing DLL file is located inside the installation folder of the program itself. However, there are many instances where the missing file is stored somewhere else. For example, the missing file could be in a different directory within the same installation folder.
To find the location of the missing file, open the folder containing the program and press Ctrl+F. When you type the name of the missing DLL file into the Search box, you should see the file listed under Results. You just need to double-click the file to start the installation process. After the installation completes successfully, close all running applications and restart your computer.
APPROVED: To fix Windows errors, click here.
Frequently Asked Questions
How can I fix the “entry point not found” error in Windows 7?
- Perform a scan with a system file checker.
- Restore your computer to the previous restore point.
- Install the DLL file.
- Reinstall the problem application.
- Install the program containing the DLL file.
- Scan for viruses and malware.
How to install a DLL file?
- Locate the missing .DLL file on the DLL Dump site.
- Download the file and copy it to "C:\Windows\System32".
- Click on Start, then on Run and type "regsvr32 dll_name.dll" and press Enter.
What does it mean if the entry point to the procedure is not found?
If no entry point for a procedure is found, the file needed to pass the process is corrupted, unreadable, or missing. If you are lucky, the syntax of the error message itself will tell you which file is missing.