- Download and install the software.
- It will scan your computer for problems.
- The tool will then fix the issues that were found.
The internet is one of the most important inventions ever. Not only does it allow us to communicate and share information, but it also allows us to connect our devices. However, many people are having trouble accessing the internet due to problems with their connections. In particular, there are times when a user gets “no internet access.”
While this issue can occur for different reasons, it often happens when a user cannot connect to the internet via Wi-Fi or wired Ethernet. While this problem can happen even when a computer is plugged into a power source, it is especially prevalent when the computer is turned off.
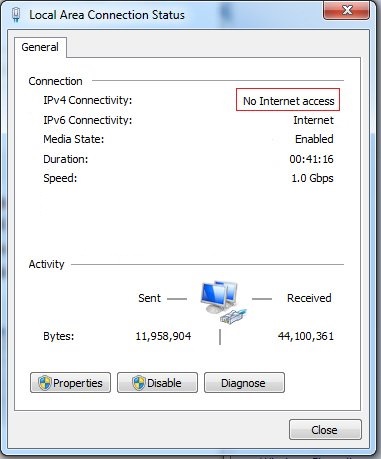
The problem occurs when you try to access something like www.google.com. When you type in the domain name into the browser, the web server responds with a message saying that the site cannot be reached because the IP address does not exist or the connection timed out. If you are lucky enough to find one of the few providers offering IPv6 connectivity, you might see the following error: “IPv6/IPV4 Connectivity: No internet access”.
In some cases, the issue is caused by an incorrect DNS configuration. In others, it is due to a misconfigured firewall or network device. Sometimes, it is simply a matter of getting your computer updated to use the latest version of Windows 10.
If the above doesn’t work, you’ll need to contact your provider about the issue. They’ll most likely ask you to verify your modem or router settings. You should be able to do this online, although you may have to call them directly. Once you’ve done this, you should be good to go.
Table of Contents:
It is recommended that you reinstall the networking drivers
Having the latest drivers installed is critical when it comes to networking. We highly recommend you update them ASAP as it can resolve the IPv4 no internet access problem almost instantly.
Follow the steps below to install the updated driver:
1. First, you will have to uninstall the current driver you currently have installed.
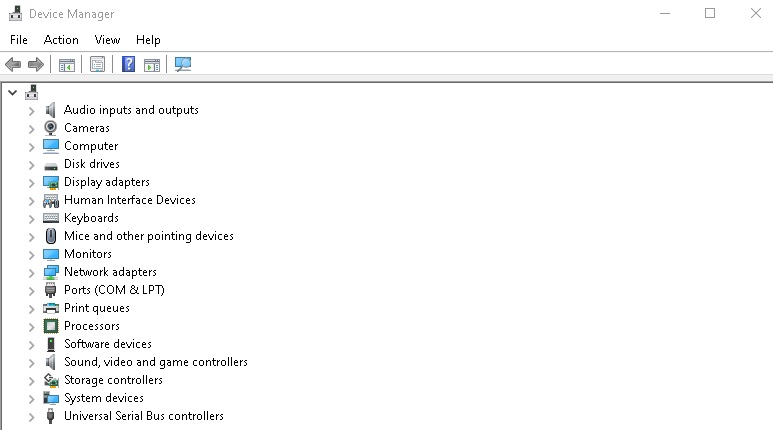
2. Type “device manager” into the search field next to the Start menu button to launch the Windows Device Manager.
3. You can also use the Windows Key+Rkey combination to open the Run dialog box.
4. In the Device Manager window, select Network adapters under the Hardware tab.
5. Click Uninstall/Change Driver.
6. Select the driver you want to remove from the list and click Remove.
7. Restart your PC and check if the new driver has been successfully installed.
8. If everything goes well, you should now be able to connect to the internet again.
Updated: April 2025
This tool is highly recommended to help you fix your error. Plus, this tool offers protection against file loss, malware, and hardware failures, and optimizes your device for maximum performance. If you already have a problem with your computer, this software can help you fix it and prevent other problems from recurring:
- Step 1 : Install the PC Repair and Optimizer Tool. (Windows 10, 8, 7, XP, Vista).
- Step 2 : Click Start Scan to determine what problems you are experiencing with your computer.
- Step 3 : Click Repair Allto resolve all problems.

Make sure you have the right IP settings
To check if your IP protocol (TCP/IP) is enabled or disabled, open up Windows Explorer and type ‘ipconfig’ in the address bar. Press enter. You’ll see a list of network adapters. Click the one you’re interested in. If it says “Enabled,” great; otherwise, it probably needs some tweaking.
You can find out what protocols are enabled on each adapter by clicking the Properties button next to the adapter name. This will bring up a dialog box where you can enable or disable specific protocols.
If you don’t know how to do this, here’s a step-by-step guide.
1. Open up Internet Options.
2. Select the Connections tab.
3. Double-click on Local Area Connection.
4. Right-click on TCP/IPv4 and select Properties.
5. Check Enable TCP/IPv4.
6. Close the dialog box.
7. Restarts your PC.
Start the troubleshooting tool for Internet connections
Windows 10 comes with a built-in troubleshooter that automatically detects problems with the network connection. You don’t even have to open up the Start menu to find it. Then select “Internet Connections.”
If there is anything wrong with your internet connection, Windows will detect it and offer you solutions. For example, Windows might recommend that you upgrade your modem or router firmware. Or it could suggest that you try connecting to another Wi-Fi hotspot.
You’ll see a list of possible causes for the problem. Clicking one of those options opens a box where you can choose what action to take.
To fix the issue, just follow the instructions. If you’re having trouble finding the option, here’s how to access it:
1. Open Settings.
2. Tap More settings.
3. Scroll down to Network & Internet.
4. Under Wireless & networks, tap Change advanced settings.
5. On the left side of the screen, scroll down until you see Troubleshoot problems.
6. Click Troubleshoot.
7. A pop-up will appear asking whether you’d like to run a diagnostic test.
8. Click OK.
9. The troubleshooter will start running. When it finishes, you’ll get a notification telling you what was fixed.
Reset your IP configuration
If your device doesn’t have a working IP address, it won’t be able to connect to the internet. This could happen because there are too many devices sharing the same IP address or because the allocated IP address has been terminated. In both cases, you’ll want to reset your IP configuration.
1. Press the Windows key + R keys to open the Run dialog.
2. Type “cmd,” hit Enter, and type “ipconfig”.
3. Look for the entry labeled IPv4.
4. Right-click it and select Properties.
5. Click Advanced Settings.
6. Select Reset.
7. Confirm the action.
8. You might see some messages about conflicting settings; just ignore those.
9. After it’s done, restart your computer.
Ensure that all antivirus and firewall programs are disabled
Antivirus software, like Avast and McAfee, is notorious for promoting the IPv4 “no internet access” problem. This happens because some antivirus software installs firewalls and other security programs without informing the user. These programs prevent you from accessing the Internet. In addition, some of these programs download and install additional programs automatically.
As a result, you should always make sure that the firewall program is disabled. If you don’t know how to do it, just press the combination of Windows key + and R keys. Type ‘Windows + R keys’ into the address bar and Enter. Then enter ‘control panel’ and press OK. Under Network & Internet, select Firewall and Security. You’ll see a list of installed firewall programs. Select each one and press Uninstall.
APPROVED: To fix Windows errors, click here.
Frequently Asked Questions
Why does my IPv4 say no network access?
No network access means no DHCP server was detected, and no link-local address was assigned. This is different from "No internet access," which means that a DHCP server was detected, but no local address was assigned. You can type "ipconfig /all" at the command line to see the current network settings.
What should I do if IPv4 is not working?
- Update your wireless router.
- Update the adapter driver and reboot it.
- Uninstall the third-party VPN software.
- Add a WLAN connection manually.
What does IPv4 Internet access mean?
Internet Protocol version 4 (IPv4) is the fourth version of the standard that controls traffic on the Internet and other packet-switched networks, introduced in 1982 by the Internet Engineering Task Force (IETF). IPv4 is the most widely used version of the protocol, despite the limitations of its 32-bit address space.