- Download and install the software.
- It will scan your computer for problems.
- The tool will then fix the issues that were found.
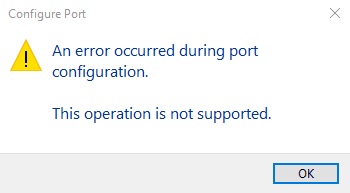
The following error appears when you are trying to configure the port of a printer. This error occurs due to some issues with the port itself. If you see this error, it means there is something wrong with the port. In such cases, you must perform a hard reset to resolve the issue. Port configuration errors often occur on Windows 10 computers. This issue occurs because there is no driver installed for the network adapter. A solution exists, however, and it involves our very effective steps.
Most people are familiar with the blue screen of death (BSOD). This happens when something goes wrong with the operating system and it crashes. But did you ever see a BSOD about printers? If you do, chances are that you’ve seen one about “the port configuration.”
The port configuration is a feature that allows your computer to communicate with certain devices like printers, scanners, cameras, etc. When you plug a device into your computer, the ports that come with the device usually match up with the ports on your motherboard. For example, if you’re installing a scanner, the USB cable plugs into a specific port on your motherboard.
When you install a new piece of hardware, you’ll probably want to set up the port settings. However, sometimes things don’t work properly. You might even get a BSOD about “port configuration.” A port configuration error occurs when a device tries to connect to a server but fails to do so because it cannot establish a connection. In some cases, you might see this error when trying to use a networked printer to print documents.
The error can occur due to several different reasons, including problems with the computer’s operating system or software, or issues with the hardware itself. You’ll want to make sure that the printer isn’t plugged into a router or modem that’s configured incorrectly. If you’re having trouble connecting to the network, check the IP address assigned to the printer. Also, try restarting the printer. Some printers require a reboot to work properly.
Table of Contents:
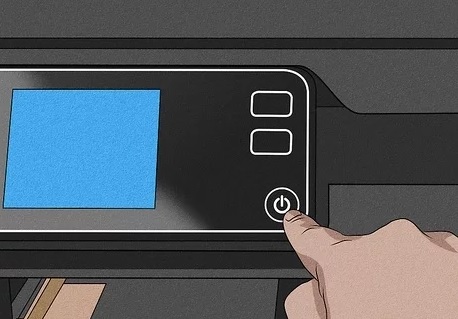
Hard-resetting your printer
If you’ve been experiencing problems with your printer, such as “An error occurred during port config,” there’s a simple solution that many people have found useful.
To do a hard reset on your printer, follow these steps:
1. Turn off the printer.
2. Remove the cartridge.
3. Disconnect the power cable from the rear of the unit.
4. Wait about 30 seconds, and reconnect the power cable.
5. Turn on the printer again.
6. Reinsert the cartridge.
7. Print a test page.
8. If everything works fine, print something important.
Updated: April 2025
This tool is highly recommended to help you fix your error. Plus, this tool offers protection against file loss, malware, and hardware failures, and optimizes your device for maximum performance. If you already have a problem with your computer, this software can help you fix it and prevent other problems from recurring:
- Step 1 : Install the PC Repair and Optimizer Tool. (Windows 10, 8, 7, XP, Vista).
- Step 2 : Click Start Scan to determine what problems you are experiencing with your computer.
- Step 3 : Click Repair Allto resolve all problems.

The printer queue should be cleared
Clear the printer queue if there’s an error message about the print server port. This step is necessary because Windows 10 doesn’t automatically detect changes to the network settings. You must manually configure the printer port.
When printing, you should clear the printer queue before printing. From here, choose “Open files”, navigate to the folder where you saved the file you wish to print, and select it. Next, select “Close all” to close all the windows related to the print task. After closing the last window, select “OK” to continue printing.
There are three ways to clear your printer queue:
1. Go to the Start Menu and type “printing” into the search field. Locate the Printing app, double-click it, and follow the instructions inside.
2. Open Control Panel, head over to System and Security, and find the Device Manager icon. Double-click the device named “Microsoft XPS Document Writer.” A pop-up window will display information about the device. Scroll down to the section titled “Queue Status.” Here, you’ll see a list of printers associated with the device. Right-click the printer you’re having trouble with, and select Properties. In the resulting dialog box, locate the “Device Type” dropdown, and change it to “Generic Parallel Port.” Press Apply and Ok to save your changes.
3. You may also need to adjust the TCP/IP properties of your printer. To do this, open Network and Sharing Center by clicking the Start button, typing netpl.wiz, and pressing Enter. Click Set Up a New Connection or Wireless Network Setup.
Make sure that 3rd party firewalls are not interfering
If you are experiencing problems with your internet connection, it could be because of a third-party firewall blocking incoming connections. This method will allow you to bypass the firewall and connect directly to the modem/router.
1. Open up a web browser.
2. Type 192.168.0.1 into the address bar. You will see a screen similar to the one shown below.
3. Click OK.
4. Enter the username and password for the router. If prompted, enter admin as the username and password.
5. Click Connect.
6. Click Save Settings.
7. Restart the computer.
8. Try connecting again.
Select a different type of account
Sometimes this error may also occur because you are trying to change the account type while you already have one set up. To fix this issue follow these steps:
1. Open Windows Settings simply by clicking the Windows logo key + I.
2. Click on the “Accounts” option.
3. Click on the “Sign In Options” tab.
4. Select the account type you want to use and click OK.
5. Restart your computer.
Changing the port settings within an administrator account
If you want to configure the printer’s settings within an administrative account, follow these steps.
1. Open the Start menu and type Printers into the Search box.
2. Right-click the printer icon in the list and select Properties from the context menu.
3. In the dialog box that opens, click the Advanced tab.
4. Select Local Administrator Rights from the User Mapping section.
5. Click OK twice to save the changes to the registry.
6. Restart the computer.
APPROVED: To fix Windows errors, click here.