- Download and install the software.
- It will scan your computer for problems.
- The tool will then fix the issues that were found.

Some users complain that they get Stop Error 0x000000A5 every time they try to install Windows 7 on their computer. In most of the reported cases, the error “Copying Windows files” appears during the installation.
In most cases, this particular problem is caused by a mismatch in the BIOS. In this case, to solve the problem, you will need to follow your motherboard manufacturer’s documentation to update your BIOS to the latest version.
If you are using a traditional hard drive but your BIOS is configured to use WIMBoot, you will need to adjust some BIOS settings to allow installation in Windows 7. In that case, go to the BIOS settings and configure the LPSS and SCC configuration for Windows 7 .
However, as reported by some affected users, the Stop 0x000000A5 error may also be related to bad RAM or a partially faulty RAM slot (or a slot full of dust and lint). If this is the case, you may be able to solve the problem by replacing the RAM card or the RAM slot that you are actively using.
Table of Contents:
Update your BIOS to the latest version
In our error-free search, we found that the “Stop Error 0x000000a5” error is mostly due to BIOS inconsistency. This error primarily indicates that the current BIOS is not suitable for the Advanced Configuration and Power Interface (ACPI) supported by Windows 7. To solve this problem, you need to update the BIOS. One thing to keep in mind though: the BIOS interfaces are completely different from motherboard manufacturer to motherboard manufacturer.
The best way to update the BIOS is to use the Internet. There you can search for “BIOS + motherboard upgrade model” and correctly follow the instructions on the official site.
We list some of the major motherboard manufacturers here, and you can visit their official website for instructions on how to update the BIOS:
- Dell
- Lenovo
- ASUS
- Acer
- Sony vaio
You can usually use a USB flash drive to update the BIOS version. Follow the steps below to update your BIOS using this method.
Updated: April 2025
This tool is highly recommended to help you fix your error. Plus, this tool offers protection against file loss, malware, and hardware failures, and optimizes your device for maximum performance. If you already have a problem with your computer, this software can help you fix it and prevent other problems from recurring:
- Step 1 : Install the PC Repair and Optimizer Tool. (Windows 10, 8, 7, XP, Vista).
- Step 2 : Click Start Scan to determine what problems you are experiencing with your computer.
- Step 3 : Click Repair Allto resolve all problems.

- First connect a blank USB flash drive, right click it and select “Format”.
- Later, set the file system to FAT32 in the format window and activate the “Quick Format” checkbox. Select “Start” to format.
- Then go to your motherboard manufacturer’s official website, download the latest BIOS firmware and copy the downloaded file to the formatted USB drive.
Note. When updating BIOS, you will need to modify files depending on your motherboard manufacturer. So you must follow the official instructions.
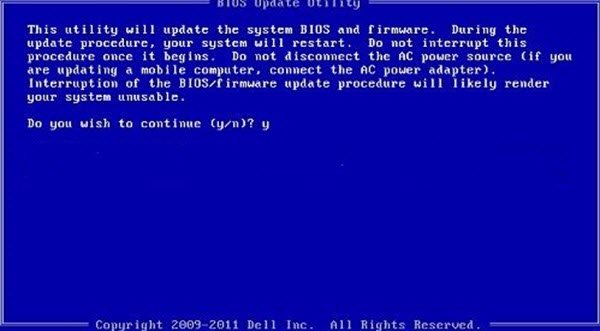
- After copying the files, restart your computer and press the setup button to enter the BIOS setup menu (if the setup screen doesn’t open, go online and search for the BIOS setup button depending on your motherboard model).
- When you enter the BIOS setup menu, see “Advanced Settings,” “Update BIOS”. “Advanced Settings” “Update System BIOS”.
- Once the update process is complete, restart your computer and wait for the next boot. Now you can remove the USB stick from the system.
As long as you don’t get the same error after this step, you need to follow the methods below to solve the problem.
Check your material
If none of the above steps helped, you may need to remove all external hardware from your PC before trying again. Depending on your particular case, you may need to remove recently added RAM modules (if any), as faulty memory keys can also cause BSODs. Finally, you can try changing the ACPI settings in the BIOS to check for inconsistent defaults.
Perform a System Restore
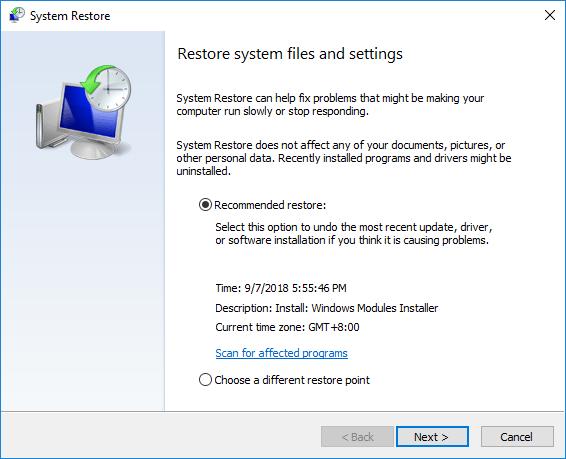
You can use System Restore to remove and disable the latest software and drivers. This will determine if one or more of your new programs may have clogged your system. To open the System Restore dialog box, load the MS Windows installation DVD (or a bootable USB drive). Instead of choosing a clean installation, click the “Restore” icon and follow the instructions to complete the installation.
Upgrade to the last successful configuration

This should be the first thing to try, as it is the easiest and most effective solution to fix Stop 0X00000024 error. Follow the instructions below:
- Reboot the computer.
- Wait until the computer completes POST (system information will appear on your screen).
- Quickly press the F8 key several times until a list of available boot options is displayed.
- Select “Last Known Configuration” (your last running settings).
- Press Enter.
- Wait for your computer to start up in this mode.
APPROVED: To fix Windows errors, click here.