- Download and install the software.
- It will scan your computer for problems.
- The tool will then fix the issues that were found.
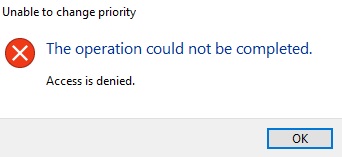
If you try to change the process priority in Task Manager and get the following error message: “Unable to change the priority. This process could not be completed. Access denied”, then you have come to the right place because today we will look at how to solve this problem. Even if you have proper administrator rights and run programs as an administrator, you will still encounter the same error. Some users also get this error when they try to change the process priority to real-time or high priority.
Generally, users should only change the process priority if they cannot access the program normally because it consumes a lot of system resources. For example, if you can’t access a graphics-intensive game or if the game crashes while playing, you might have to open Task Manager and assign the processes a real-time priority or high priority so that you can play the game without crashing or lagging.
But again, you can’t assign a high priority to the process because the “Access Denied” error message appears. The only solution you can come up with is to boot in safe mode and try to assign the right priority, ok, you can successfully change the priority in safe mode, but if you boot into Windows and try to change the priority again, you will encounter the same error message again.
In general, a PC or laptop with insufficient specs can cause many intensive games to run below standard. If the game is very demanding, the refresh rate may be low and the game may fail. One solution is to set a high priority for a game or software process in Task Manager to tell Windows that more power should be reserved for that process.
However, sometimes you can’t change the priority in the Task Manager. You will either get an “Access Denied” message, or the priority simply cannot be changed. This can either be for all processes on your system, or for a specific process on all systems.
In this article, I will show you some effective methods to solve this problem.
Table of Contents:
Start your computer in safe mode
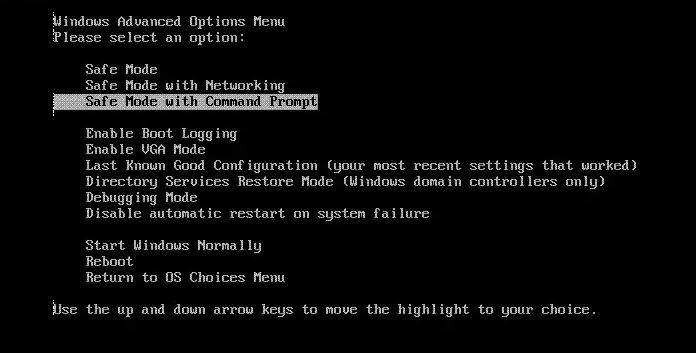
Safe Mode is one of those features that every Windows 10 PC owner should know about. However, it might seem like a hassle to boot into Safe Mode, especially if you don’t know how to do it. Luckily, there are several ways to enter Safe Mode on Windows 10 PCs. Here’s how to access Safe Mode on Windows 10.
To enter Safe Mode on Windows computers, follow these steps:
1. Press the power button on your computer.
2. After the computer turns off, press the Shift key repeatedly.
3. When the screen appears again, select the Restart option.
4. Select Troubleshoot option.
5. Click Advanced Options.
6. In the Startup Settings window, click Restart.
7. Select Safe Boot from the list.
8. Click OK.
9. Wait until the computer restarts.
Updated: April 2025
This tool is highly recommended to help you fix your error. Plus, this tool offers protection against file loss, malware, and hardware failures, and optimizes your device for maximum performance. If you already have a problem with your computer, this software can help you fix it and prevent other problems from recurring:
- Step 1 : Install the PC Repair and Optimizer Tool. (Windows 10, 8, 7, XP, Vista).
- Step 2 : Click Start Scan to determine what problems you are experiencing with your computer.
- Step 3 : Click Repair Allto resolve all problems.

Activate or deactivate UAC
To turn off UAC security prompts, follow these steps:
1. Press the Windows key + R keys together.
2. Type “Control NUSRMGR.” without quotes into the Run box.
3. A Control Panel window will open up.
4. 5. Select Change account settings.
6. Under the General Settings tab, select the option labeled “Turn Off UAC Prompt”.
7. Click Apply.
8. Close the Control Panel window.
Reinstall Windows 10 after a repair
If none of the methods above worked, it could mean that there is something wrong with your system that needs repairing. You can try to fix the issue yourself, but it is recommended that you hire a professional technician to do the job for you. If you decide to go ahead and do it yourself, here are some things you need to know about how to perform a repair install.
1. Prepare Your Computer: Before starting the repair process, make sure that your computer is clean and free of viruses. You can use anti-virus software such as Malwarebytes Anti-Malware or Microsoft Security Essentials. Also, you can download a registry cleaner like CCleaner.
2. Back Up Everything: Back up everything important on your PC, including files, documents, pictures, videos, music, etc. Make sure that you save your files somewhere else because you don’t want to lose anything while doing the repair.
3. Remove Programs: You need to uninstall programs that you no longer use. Uninstall programs that you don’t need anymore including games, apps, drivers, tools, and others.
Consider using Process Explorer
Download the Process Explorer program from here. Make sure you run it as administrator and change the priority. If you’re getting an “Unable to set Real-Time Priority” error while trying to change the priority of a process to high, then try the other method.
Note: Setting a process priority is very risky as the system processes run with a lower priority. So, if you do this, don’t forget to check whether your computer is still running fine or not.
All the internet articles are misleading people to think that setting a process priority too high will make it run faster. But, it won’t always work. There are very rare cases or exceptions where this works.
Ensure that the Administrator has full permissions
Reboot your computer and go into the BIOS settings. You will see a screen like this one:
If you are seeing something different, it could mean that the administrator account is locked out. If this happens, follow these steps to unlock the administrator account:
1. Right-click on the name of the current user and choose Properties.
2. Click on the Change Password button.
3. Enter the password you want to use. Make sure you remember it because you won’t be able to change it again.
4. Click OK twice to save changes.
Display all user processes
You might encounter a situation where the task manager doesn’t show processes from all users even though you’re logged in as an admin. In such cases, follow these steps to make sure you are seeing all the processes running under your account.
1. Make sure you are using an administrative account.
2. Right-click on the taskbar and select “Task Manager”.
3. Select “Show processes from all users”.
4. Run your program or application for whose priority you wish to change.
5. If you still don’t see the process, try restarting your computer.
APPROVED: To fix Windows errors, click here.
Frequently Asked Questions
How do I set a high priority in Task Manager?
- Right-click on the taskbar and select Run Task Manager.
- Click the Processes tab.
- Right-click on the desired process, select Set Priority, and set the desired priority.
How to change the priority in the Task Manager?
- Launch the Task Manager (right-click on the launch panel and select Task Manager).
- Click the "Processes" tab.
- Right-click on the desired process and select "Set Priority".
- You can then select a different priority.
- Close the Task Manager.
How can I permanently change the priority of a program on a Windows PC?
- Press Ctrl + Shift + Escape to open the Task Manager.
- Switch to the Details tab.
- Select a process and right-click on the selected process.
- Select Set Priority from the context menu.