- Download and install the software.
- It will scan your computer for problems.
- The tool will then fix the issues that were found.
The “could not create the Java virtual machine” error occurs when you try to run Java applications on Windows 10. This error usually happens because you don’t have enough memory to run Java programs. To fix this problem, follow the steps below.
Table of Contents:
Why do I get java virtual machine errors?
The Java virtual machine (JVM) is responsible for running applications written in the Java programming language. When you install a program written in Java, it runs inside the JVM. If something goes wrong while the program is being executed, you might see a message like “Java VM Launcher Error.” This happens when there is some problem with the JVM itself. A common cause of this error is a version mismatch. Incompatible versions of Java can lead to crashes and other issues. You can fix this issue by updating the version of Java installed on your computer.
There are several possible causes for this error. One is missing dependencies. For example, you could be missing one of the following components:
* JDK 8 Update 151
* OpenJDK 11
* Oracle JDK 9
Look under Installed Updates and select the Java tab. Click View Details next to each item listed. If you don’t see anything listed, make sure you have the latest update available. Scroll down to the bottom of the page and click Download Now. Follow the instructions on the screen.
What are the causes of the ‘could not create a java virtual machine’ error?
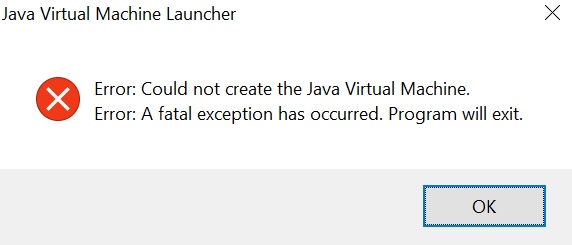
This article explains how to fix the “could not create a java virtual machine” error. This error occurs because there is not enough memory available to run the application. When you try to start the application, you receive an error similar to the one shown here.
Several different things could cause the error. You could have an old version of Java installed on your computer. Or, you could have a corrupted.jar file. If this happens, you must uninstall Java entirely and reinstall it. Then, download the latest version of Java. Finally, make sure that you install the correct version of Java for your operating system. For example, if you use Windows 7, you should install Java 8 Update 45.
If none of those solutions work, you can increase the amount of memory allocated to the Java Virtual Machine. Click on the Change button next to Available memory and change the value to 512 MB. After doing this, restart your computer. When you launch the Java application again, you should no longer see the error.
Java should be run as an administrator
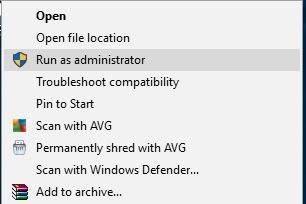
Sometimes virtual machine errors can be due to the lack of appropriate admin privileges on your Windows PC. This could happen because you don’t have administrative access to your computer. If you’re having trouble installing Java Runtime Environment (JRE), check out our guide to getting Java installed on your PC.
To ensure that you have full control over Java, you’ll want to make sure that the program runs under the system administrator account. You can do this by selecting “Start,” typing “Java,” and selecting “Open File Location.” From here, you’ll want to navigate to the folder where Java is located and open java.exe in Notepad. Scroll down to the bottom of the document and look for the following text:
C:\Program Files\Java\jre1.8.0_102
You’ll want to change jre1.8.x to jre1.8.*. Save the changes and close Notepad. Now, restart your computer and try running Java again. If there are no problems, you’ve successfully changed the permissions on your JRE installation.
Updated: April 2025
This tool is highly recommended to help you fix your error. Plus, this tool offers protection against file loss, malware, and hardware failures, and optimizes your device for maximum performance. If you already have a problem with your computer, this software can help you fix it and prevent other problems from recurring:
- Step 1 : Install the PC Repair and Optimizer Tool. (Windows 10, 8, 7, XP, Vista).
- Step 2 : Click Start Scan to determine what problems you are experiencing with your computer.
- Step 3 : Click Repair Allto resolve all problems.

You should uninstall and then reinstall Java
Java is one of those things that we use every day without even realizing it. For example, I used to think my computer had a virus because I kept getting popups telling me about it. But it turns out that it was Java. After doing some research, I found out how to uninstall and reinstall Java. Here are the steps:
1. Open Control Panel.
2. Click Programs and features.
3. Scroll down to Java, select Java, and click Uninstall.
4. Wait while Windows uninstalls Java.
5. Restart your computer.
6. Go to java.com/download and download the latest version of Java.
7. Install Java.
8. Run the installer.
9. Follow the instructions.
10. Done!
Increase Java’s available memory
To expand the available system memory required for Java, you must modify the environment variable JAVACMD. You can do this either manually or via a script. If you are using Windows 10, use the following instructions:
1. Open Command Prompt (cmd).
2. Type setx JAVA_OPTIONS -Xms256m -Xmx512m.
3. Press Enter.
4. Restart your computer.
If you are using Linux, Mac OS X, or another Unix variant, open Terminal and type export JAVA_OPTS”-Xms256M -Xmx512M”. Then restart your computer.
Ensure Java is correctly installed
Before you can troubleshoot anything related to Java, you’ll need to make sure that you’ve installed Java properly. This includes both installing Java itself and ensuring that you’re running the correct version of Java. There are several ways to check whether you’ve installed Java correctly, including checking the version number and searching online for help.
1. To start, open the command prompt and type “java -version.” You should receive something like this:
java version “1.8.0_131”
Java(TM) SE Runtime Environment (build 1.8.0_31-b13)
2. Java HotSpot(TM) 64-Bit Server VM (build 25.131-b13, mixed mode)
If you see the same information, you’re good to go. Now let’s look at how to verify that you’re running the correct version of the JRE. Open the command prompt again and type “java -v,” followed by pressing enter. You should now receive output similar to this:
java version ” ”
Java(TM)-based Virtual Machine Launcher
3. The version number will be different depending on which version of Java you have installed. The version number will also vary from platform to platform.
4. Now that you know what version of Java you have, you can search for more detailed information on how to install Java.
Java version compatibility should be checked
The error: “could not create a java virtual machine” occurs when you compile code in an IDE. When compiling, the compiler needs access to the JDK, the JRE, and the class libraries. These are typically bundled together into one package called the JDK. However, the JDK can be installed separately from the JRE and class libraries. In this case, the compiler won’t know where to find the required files.
1. To fix this problem, ensure that the proper versions of Java are installed. You’ll want to look up the exact requirements for your IDE.
2. Next, check which versions of Java your editor supports. Some IDEs support multiple versions of Java simultaneously. For example, NetBeans 7.2 supports Java 5, 6, and 7. If your IDE doesn’t mention which versions it supports, contact the vendor.
3. If it isn’t compatible with the version of java that is installed on your computer, download the latest version of Java. Make sure that you’re installing the appropriate version of Java for your operating system. Finally, restart your computer.
APPROVED: To fix Windows errors, click here.
Frequently Asked Questions
Why can’t Java create a virtual machine?
The most common reason for the "Java virtual machine could not be created" error message is that Java does not have enough memory on your system to run the VM client.
Why does it say that the Java virtual machine could not be created?
The "Java Virtual Machine" error message often occurs when Java requires a larger total maximum heap memory size. Users have solved the problem by increasing the maximum amount of RAM allocated to Java.
How to restore the Java VM error?
- Make sure that you have installed Java correctly.
- Run the program as administrator.
- Add a new Java system variable.