- Download and install the software.
- It will scan your computer for problems.
- The tool will then fix the issues that were found.
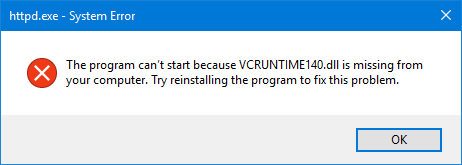
VCRUNTIME140.dll is missing – this is an error that may occur on Microsoft Windows computers. Typically, the problem occurs after installing a Windows update or after a failure to install a particular program. Sometimes reinstalling the program that requires this file will work, but there are other causes and solutions to the problem vcruntime140.dll not found.
VCRUNTIME140.dll is a dynamic link library file – it works just like an executable, but it is only loaded when the software that is using it needs it. Thus, when such a file is corrupted or missing, users may see a VCRUNTIME140.dll error, which causes the application to fail to start.
A pop-up window notifying you that the file is missing usually prompts users to search the Internet for a link to download VCRUNTIME140.dll. However, you should not download this file from questionable websites, and you should also know which version is suitable for your operating system. Also, third-party websites can often be used to put malware in download links. So you better stay away from them.
In this article, we are going to provide fixes for the missing VCRUNTIME140.dll error so that you can solve the problem without the help of an IT professional. Please note that it is important to read the instructions and carefully follow the steps above to add the correct version of the DLL file to your Windows operating system to solve vcruntime140.dll not found problem.
Speaking about the origin of the missing file, we should say that VCRUNTIME140.dll is a file used by the distributed Visual C ++ package for Visual Studio 2015 [3]. The C ++ file package is installed by the software that needs it, and the individual C ++ files are still responsible for running the runtime components of the software environment.
Table of Contents:
Load a new copy of VCRUNTIME140_1.dll

In this method we will download VCRUNTIME140_1.dll from the official website and install it on the system. Since this is a new installation, the corrupted file will be overwritten or a new Windows registry will be created if it is missing.
Updated: April 2025
This tool is highly recommended to help you fix your error. Plus, this tool offers protection against file loss, malware, and hardware failures, and optimizes your device for maximum performance. If you already have a problem with your computer, this software can help you fix it and prevent other problems from recurring:
- Step 1 : Install the PC Repair and Optimizer Tool. (Windows 10, 8, 7, XP, Vista).
- Step 2 : Click Start Scan to determine what problems you are experiencing with your computer.
- Step 3 : Click Repair Allto resolve all problems.

- Download the missing VCRUNTIME140_1.dll file from the official site.
- Open the compressed folder and extract the VCRUNTIME140_1.dll file.
- If you are using a 64-bit version of Windows, go to the following path and paste the extracted file here
- C: \ Windows \ System32
- If you use a 32-bit version of Windows, go to the following path and paste the extracted file here
- C: \ Windows \ SysWOW64
Re-register the file VCRUNTIME140.dll
You can use the command line to reregister the missing DLL file, which may solve your problem. To do this, simply follow the instructions below and execute the commands correctly.
- Press Windows + R on your keyboard to open the “Run” utility. Type “cmd” in the input box. When you’re done, press Ctrl + Shift + Enter to run the command prompt with administrator privileges.
- When prompted, allow the prompt to make changes to your device by clicking Yes.
- First, you need to unregister the file. You can do this by typing or copying the following command and pressing Enter: regsvr32 / u VCRUNTIME140.dll
- Then you will need to save the file again. You can do this with the following command: Be sure to press Enter after typing: regsvr32 VCRUNTIME140.dll
- Close the command line window and try to run the problem application again.
Download the distributed component Microsoft Visual C ++ 2015-2019
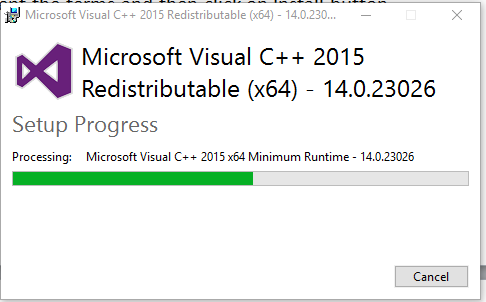
A distributed component of Microsoft Visual C ++ is a set of dynamic linking libraries (DLL files) that various programs need to run in the Windows operating system. Sometimes VCRUNTIME140_1.dll, missing in the common library of Microsoft Visual C ++, may be lost, damaged or corrupted. The only solution is to install Microsoft Visual C ++. The problem seems to be solved by installing the distributed Microsoft Visual C ++ 2015-2019 packages.
Before installing these packages, make sure your system is up to date. Go to the search bar, type update, and click Check for updates.
Download and install the latest distributed version of Microsoft Visual C ++ on your system.
Run the System File Checker (SFC scan).
The System File Checker is a tool available by default in Windows 10. Also known as “SFC scan,” it’s the fastest way to automatically fix corrupt system files and other problems.
Here’s how to do it.
- Press Windows + R on your keyboard to launch the “Run” utility. Type “cmd” and press Ctrl + Shift + Enter. This will open a command prompt with administrator privileges.
- If prompted, make sure the prompt makes changes to your device. This means that you may need an administrator account.
- Enter the following command and press Enter: sfc / scannow
- Wait for the system file checker to finish scanning your computer. If any errors are found, you can use the SFC command to automatically fix them yourself, which can also fix related errors.
APPROVED: To fix Windows errors, click here.