- Download and install the software.
- It will scan your computer for problems.
- The tool will then fix the issues that were found.
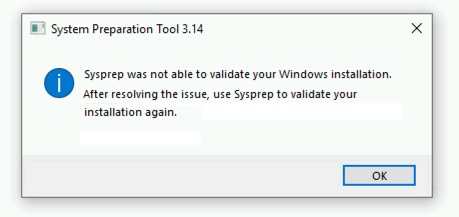
The Sysprep error occurs when the system preparation tool fails to prepare an image file for deployment. When you perform Sysprep, it prepares an image file containing everything needed to deploy a server onto another computer. If you are running Windows Server 2008 R2 Standard Edition or Windows Server 2012 Standard Edition, this error might occur because you do not have enough space on the disk to store the image file.
This error usually happens when you attempt to install or uninstall a software program. You might encounter this error while trying to run Microsoft Office 2016 or some other software. If you are facing this error, it is vital to fix it immediately because it could lead to system damage.
There could be several reasons why this error occurs, including one of the following:
1. A previous installation of the same version of the program is still running in the background. In such cases, you must close all instances of the program before installing the latest version.
2. Some programs require additional files to be installed. Make sure that you download the correct file(s).
3. Some applications don’t support older versions of Windows.
4. Certain hardware components aren’t compatible with certain operating systems. For example, there are hardware devices that work only with Windows 8.1 or later.
Table of Contents:
SFC scans should be performed
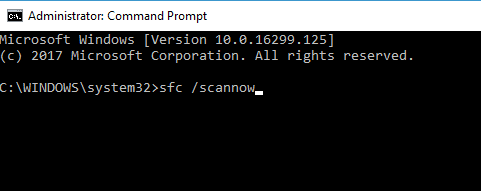
1. Open Command Prompt window as an administrator.
2. Type command sfc /scannow. This command will scan for missing and corrupt files on your computer. If you receive errors, it could mean some problems with the hard disk.
3. Press Enter key to execute the command.
4. Wait for the process to finish. When it finishes, press Ctrl+C to stop the execution.
5. Copy the output file and paste it here.
6. In case you want to delete the log file, open Notepad and type cmd /c del %temp%\sfc_log.txt and hit enter.
7. Close the Notepad window.
Updated: April 2025
This tool is highly recommended to help you fix your error. Plus, this tool offers protection against file loss, malware, and hardware failures, and optimizes your device for maximum performance. If you already have a problem with your computer, this software can help you fix it and prevent other problems from recurring:
- Step 1 : Install the PC Repair and Optimizer Tool. (Windows 10, 8, 7, XP, Vista).
- Step 2 : Click Start Scan to determine what problems you are experiencing with your computer.
- Step 3 : Click Repair Allto resolve all problems.

You can disable Bitlocker by turning it off
If you are seeing this error message, it could mean one thing: BitLocker is turned on. This feature encrypts the contents of your computer’s hard disk drive, making it difficult for anyone else to access it without your permission.
However, there’s a way around this. You just need to turn BitLocker off while running Windows 10 System Preparation Tool (SysPrep).
To do this, follow the steps below:
1. Open up Command Prompt (CMD) by pressing the Win + X keys together.
2. Type cmd into the Search box and press Enter.
3. In the command prompt window, type “powercfg /h off.”
4. Press Enter again.
5. Wait for the process to finish.
6. Reboot your PC.
7. Once you log back in, BitLocker will be disabled.
Make sure the Upgrade key is removed
1. Right-Click on the Windows Key & the R Keys Together
2. Type “Regedit” and Click OK
3. Navigate to HKEY_LOCAL_MACHINE\SOFTWARE\Microsoft\Windows NT\CurrentVersion\AppCompatFlags\Layers
4. Delete the value named “Upgrade.” If you see it there, delete it.
5. Restart your computer and try again.
It is recommended that you reinstall the default Windows applications
Microsoft recently announced that it’s rolling out a new Windows 10. This update includes several fixes and improvements, including one that removes the requirement to reinstall the default apps. If you are experiencing problems with the default apps, such as missing icons, you must uninstall and re-install them. To do so, follow these steps:
1. Open Settings.
2. Click on Update & Security.
3. Under Privacy & Safety, select Programs.
4. Scroll down to Uninstall a Program.
5. Select the program and click Remove.
6. Wait for the process to complete.
7. Repeat Steps 2–6 for each app you want to reinstall.
8. Restart your computer.
9. Enjoy your updated Windows experience.
Setting up a new administrator account
If you are having trouble finding the Upgrade key in the registry, follow the steps mentioned above. However, some users have been able to locate the Upgrade key by creating a new administrator account.
1. To do this, press the Windows key and type Settings into the search box. You will now see a dialog box asking whether you want to create a new administrator or regular user account.
2. Choose the former option and enter a name for the new account. Next, select Create. This will create a new administrator account on your computer.
3. After doing this, log off the current one and log in as the newly created one. Delete the old accounts. Now, try opening the Upgrade key again.
Remove and install the app packages
The solution is quite simple. You just need to uninstall the package and re-install it again.
Note: If you are still getting this error after uninstalling the corrupted package, please follow the steps mentioned here.
1 Select the program that needs to be reinstalled and click on Change/Remove button.
2. Click on OK.
3. In the list of programs, select the application you want to reinstall and click on the Install button.
APPROVED: To fix Windows errors, click here.