Updated April 2025: Stop these error messages and fix common problems with this tool. Get it now at this link
Microsoft regularly releases updates to Windows that your computer needs to get the latest patches and security fixes. On most PCs, the Windows Update service runs automatically and alerts you to upcoming updates that need your attention.
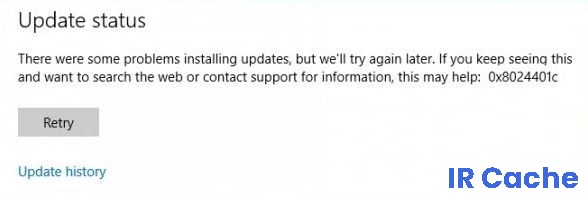
Unfortunately, the update service doesn’t always work as expected, leading to errors such as 0x8024401c. If system updates are stuck on your PC due to error code 0x8024401c, learn how to solve the problem without calling a professional.
Table of Contents:
What causes Windows Updates error 0x8024401c?
Error 0x8024401c occurs when Windows cannot download and install Windows Updates because it cannot connect to Microsoft’s Windows Update servers. This can be caused by Internet connection issues or server timeouts.
Many users encountered the problem when Microsoft released Windows 10 Technical Preview and allowed users to test it. However, the problem was not limited to Technical Preview but also occurred to Windows 10 users and users of previous versions of Windows.
Sometimes, the cause of error 0x8024401c lies on the user side when they don’t have a stable internet connection to download the Windows update. The error can also occur due to missing system files and problematic drivers.
How t repair the Windows Update error 0x8024401c?
This tool is highly recommended to help you fix your error. Plus, this tool offers protection against file loss, malware, and hardware failures, and optimizes your device for maximum performance. If you already have a problem with your computer, this software can help you fix it and prevent other problems from recurring:
Updated: April 2025

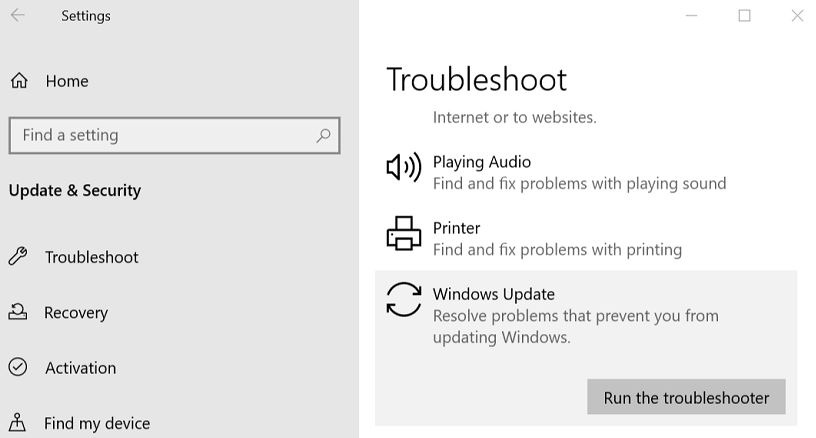
Launch the Windows Update troubleshooter
- Press “Windows + I” to launch the settings, click on the “Update and Security” option and select the “Troubleshooter” button on the left side.
- Click on the “Advanced Troubleshooting” option and select the “Windows Update” option in the next window.
- Click on the “Run Troubleshooter” option and wait for the troubleshooting process to complete.
- Make sure that the Windows Update troubleshooter fixes error 0x8024401c on your computer.
Disable the firewall
- Press the “Windows + R” key combination to run “Run”, type “Firewall.CPL” and press
- Enter to access the firewall control panel.
- Here, click on the “Enable or Disable Windows Defender Firewall” option and make sure you select the “Disable Windows Defender Firewall” button for the private and public network settings.
- Now click “OK” and restart your computer.
- Then press the key combination “Windows + S” to open a search window, type “Firewall and Network Protection” and press Enter.
- Here, click on the “Reset default firewalls” option and confirm the request.
- Check to see if this solved the problem.
Uninstall recently installed applications
- Press “Windows + R” to run the Run program, type “appwiz.CPL” and press “Enter” to launch the application wizard.
- Click on the “Installed on” drop-down menu to sort the applications according to when they were installed.
- Now uninstall the software that may have caused this problem from your computer by right-clicking on its name and selecting the “Uninstall” button.
- After uninstalling, check to see if the problem has been fixed.
Perform a full virus scan
- Press “Windows + I” to access the settings, click on the “Update and Security” option, and select the “Windows Security” button on the left side.
- Then click on “Virus and Threat Protection” on the right side and click on “Scan Options” in the next window.
- Then activate the “Full Scan” option and click the “Scan Now” button to start scanning.
Change the DNS server
- Press “Windows + R” to open the “Run” window, type “ncpa.cpl” and press “Enter”.
- Now right-click on your connection and select “Properties”.
- Then double-click on “Internet Protocol version 4 (IPv4)” and select “Use the following DNS server addresses”.
- Enter “8.8.8.8.8” in the preferred address column and “8.8.4.4” in the alternate address column.
- Click “OK” to save your changes and close the window.
- Verify that the Microsoft Store is now working properly.
Perform a system restore
- Press “Window + R”, type “sysdm.CPL” and press Enter on your keyboard.
- On the “System Protection” tab, select the drive where Windows is installed and click “System Restore”.
- Select an earlier time and click “Next”. Follow the instructions on the screen and wait for the process to complete.
- Check if the problem is resolved after restoring your computer.
APPROVED: To fix Windows errors, click here.
Frequently Asked Questions
How to fix error 0x8024401c?
- Make sure that your copy of Windows 10 is activated.
- Check your Internet connection.
- Reboot your computer.
- Disable IPv6.
- Disable the paid connection.
- Switch to another network.
- Run the Windows Update troubleshooter.
- Run DISM, then run SFC /Scannow.
What is the cause of error 0x8024401c?
Error 0x8024401c occurs when Windows cannot download and install Windows updates because it cannot connect to Microsoft's Windows Update servers. This can be caused by Internet connection issues or server timeouts.
How do I fix a failed Windows update?
- Open settings.
- Click on Update and security.
- Click on Troubleshooting.
- Under Start and Run, select Windows Update.
- Click Run Troubleshooter. Source: Windows Central.
- Click the Close button.
Why can’t my computer complete the update?
If Windows can't complete the update, make sure you're connected to the Internet and have enough space on your hard drive. You can also try restarting your computer or checking that the Windows drivers are installed correctly.