- Download and install the software.
- It will scan your computer for problems.
- The tool will then fix the issues that were found.
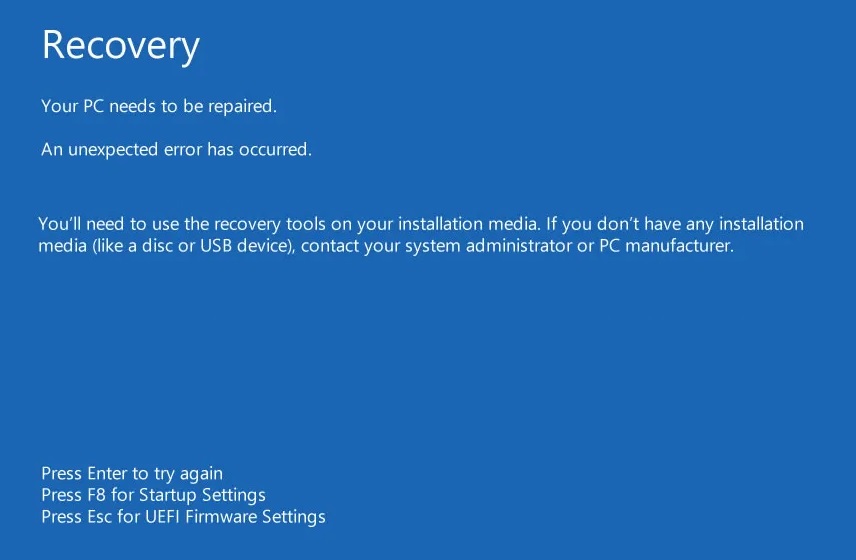
The dreaded blue screen of death is one of those errors that most people dread seeing on their computers. If it happens while you’re working, you’ll likely want to know how to fix “your pc needs to be repaired.”
This error usually appears when there’s something wrong with your hard disk, which isn’t good news. You see, the problem here is that your system files are corrupted. When this happens, you won’t be able to access anything on your computer because everything is stored on your hard disk.
What do you do now? You could try to repair your hard disk, but that requires you to reboot your computer. While this sounds simple enough, it’s pretty tricky since you don’t have control over what’s happening inside your machine. In fact, you can’t really do much about it either, except wait for the repair process to finish.
But, there are ways around this. For example, you could attempt to restore your system files from a backup. Or, you could perform a complete reset of your computer. Either way, you’ll still end up with a clean operating system, which makes life easier for you.
Table of Contents:
What causes the ‘your pc needs to be repaired’ issue
The most common reason why Windows fails to start up is because of errors in the BIOS settings. When Windows starts up, it uses the BCD (the Boot Configuration Data) to determine where the operating system resides. Sometimes, however, there are problems with the BCD data itself, which could cause Windows to fail to load correctly.
If you see a ‘your pc needs to be repaired’ error, here are some possible causes:
1. Your hard disk might be failing.
2. Your motherboard might be defective.
3. Your RAM might be faulty.
4. There might be a problem with your power supply.
Starting the SFC or DISM
The System File Checker (SFC) is a utility included in Windows Vista, 7, 8, and 10 that scans for missing, damaged, or incompatible system files. You can use it to identify and fix problems with system files. If there are errors with system files, you might experience unexpected behavior such as blue screens, crashes, program freezes, or startup failures. These issues can cause severe damage to your operating system.
The Disk Cleanup Tool includes a built-in scan function that helps clean up temporary files and unneeded programs and data. This tool does NOT delete important files. To find out which files are safe to delete, see the “Clean Up Unwanted Files” section later in this topic.
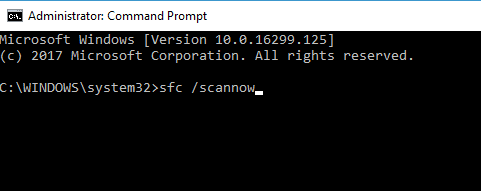
To run the SFC, follow these steps:
1. Click Start, type cmd in the Search box, and press ENTER.
2. At the Command Prompt window, type sfc /scannow, and press ENTER.
3. In the Reboot Required dialog box, select Yes, reboot now, and press OK.
4. When prompted, restart your PC.
5. After rebooting, review the messages displayed during the boot process to determine whether the SFC was completed successfully.
6. If the SFC did not completed successfully, contact Microsoft Customer Support Services.
Updated: April 2025
This tool is highly recommended to help you fix your error. Plus, this tool offers protection against file loss, malware, and hardware failures, and optimizes your device for maximum performance. If you already have a problem with your computer, this software can help you fix it and prevent other problems from recurring:
- Step 1 : Install the PC Repair and Optimizer Tool. (Windows 10, 8, 7, XP, Vista).
- Step 2 : Click Start Scan to determine what problems you are experiencing with your computer.
- Step 3 : Click Repair Allto resolve all problems.

Restoring or recovering a system image
If you ever lose access to important files, there are ways to retrieve them. One of those methods is called System Restore. This tool lets you return to a previous state of Windows 10. You can use it to roll back changes to your computer settings, such as installing programs or changing your desktop wallpaper. In addition, System Restore can help you recover deleted files. If you accidentally delete something, you can use System Restore to bring it back.
When restoring a backup, you must select the most recent restore point. Otherwise, you could overwrite important information. Here, you’ll find options to view the list of restore points. Select the one you want to use. Then press Restart Now.
You can also use System Image Recovery to restore a previous version. Choose the date and time range you’d like to restore. Press Next. Click Yes to begin the process.
Start the startup repair process
1. Press F2 to access the Advanced Options screen. Select Troubleshoot.
2. Select Command Prompt. Click Yes to continue.
3. Type “bootrec /fixmbr”, hit Enter. Type “bootrec /fixboot”. Hit Enter.
4. Reboot the computer.
5. If you are still unable to start up, usually type “recovery console” and press Enter.
6. Type “chkdsk c:\” and hit Enter. If there are errors, reboot again.
7. Type “exit” and hit Enter. Reboot the system.
You should reinstall your operating system
If you are facing issues while updating Windows 10, it could be due to several reasons such as registry corruption, faulty drivers, incompatible apps, etc. In case you don’t want to reinstall the operating system, here is how to fix those problems without losing data.
1. Download and install WinREPLACE.exe file from the Microsoft site.
2. Run the program and select “Replace Windows.” You’ll see the following screen.
3. Click “Next,” accept the default settings, and press “Start.”
4. Wait till the process completes. After reboot, check whether everything works fine or not. If not, follow the steps mentioned above.
Update your system with the latest versions
If you are having problems with your computer, it could be due to outdated software. If you’re running Windows 10, Microsoft has released some free updates that might fix the issue.
To reset your PC, follow these steps:
1. Press the Windows key + R buttons together.
2. In the box that appears, type “recovery”.
3. Click on the Recovery button.
4. Choose the option called Command Prompt.
5. Type “bootrec /fixmbr”, without quotes.
6. Type “bootrec /fixboot” without quotes.
7. Press OK.
8. Restart the computer.
Switch to Safe Mode by rebooting your computer
When the computer boots into Safe mode, you can remove the problematic programs. This method requires some technical knowledge. You must boot the computer into Safe Mode by pressing either the F2 key or the F8 key during startup. If you press F2, it will take you directly into Safe Mode. If you press F8, it will go into Safe Mode after Windows loads up. Once you enter Safe Mode, you can use the Add/Remove Programs tool to uninstall the offending program.
APPROVED: To fix Windows errors, click here.
Frequently Asked Questions
What does it mean when your PC needs to be repaired occurs?
Your computer needs repair is an error message that appears on a blue screen when Windows stops booting. The error message doesn't tell you what you did wrong or why the error occurred.
How do you fix an error that indicates your PC needs to be repaired?
- Insert the original installation DVD or USB drive.
- Reboot your computer.
- Boot from the DVD/USB.
- On the installation screen, click Restore Computer or press R.
- Click Troubleshooting.
- Click Command Prompt.
- Enter the following commands: bootrec /FixMbr bootrec /FixBoot bootrec /ScanOs bootrec /RebuildBcd.
How do I fix the Windows Blue Screen if my PC needs repairs?
- Press the Windows Logo + I keys on your keyboard to open Settings.
- Go to Update and Security -> Repair.
- Under Advanced Startup, select Restart Now.
- After your computer restarts and the "Choose an option" screen displays, select
- Troubleshooting -> Advanced -> Restore.
- System Restore.