
- Download and install the software.
- It will scan your computer for problems.
- The tool will then fix the issues that were found.
This error occurs if there is some problem with your registry entries related to Power Plans. You can either try deleting all the registry entries related to Power Plan manually or you can use third-party tool to clean up all the leftover junk files. In this article, we will talk about the most effective solutions for this error message.
Table of Contents:
Start the Windows Update troubleshooter
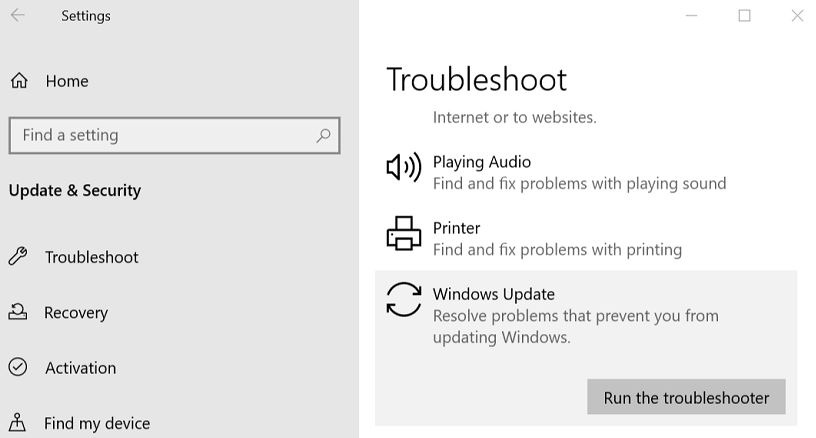
If you are experiencing errors like “Windows cannot check online for updates because there is no Internet connection,” or “The system cannot connect to the server,” it could mean that you’re missing some important files.
- To start the Windows Update Troubleshooter, open the Start menu, type “troubleshoot” into the Search box, and press Enter.
- Click on the option titled “Troubleshooting Information.”
- In the window that opens, select the option labeled “Check for solutions to common computer problems.”
- Now, click on the button named “View installed updates.”
- You will see a list of available updates. Select the update(s) that you want to install. Click Next.
- When the installation finishes, restart your PC.
Updated: April 2025
This tool is highly recommended to help you fix your error. Plus, this tool offers protection against file loss, malware, and hardware failures, and optimizes your device for maximum performance. If you already have a problem with your computer, this software can help you fix it and prevent other problems from recurring:
- Step 1 : Install the PC Repair and Optimizer Tool. (Windows 10, 8, 7, XP, Vista).
- Step 2 : Click Start Scan to determine what problems you are experiencing with your computer.
- Step 3 : Click Repair Allto resolve all problems.

Run the Windows power troubleshooter
If you are having problems with your computer, it may be because of a hardware or software problem. If this is the case, try running the Windows Power Troubleshooter to see if that helps resolve the issue. The Windows Power Troubleshoot tool will scan and repair any issues found on your system. It can also help identify potential problems before they occur.
Here are the lists of steps on how to run the Windows power troubleshooter on Windows 10:
- Open the Start Menu by pressing the Windows logo key + X.
- Type “power” in the search bar and hit enter.
- On the results page, right-click on the “Power Options” link and choose “Open Power Options.”
- On the left side of the screen, click on the “Choose what the power buttons do” link.
- Now, click on the “Change settings that are currently unavailable” link under the “Shutdown options” section.
- A new window should appear where you can change the following options.
- After making changes, click OK.
- Restart your computer to apply the changes.
Run a full system scanning
Malicious software may cause your computer to display error messages like “Power Plan Information not available.” In addition, you may experience slow performance and frequent crashes. You might even find yourself unable to access files. If you are experiencing any of these symptoms, run a full system scan. This will clear out everything that could potentially harm your computer.
You can use Microsoft Security Essentials (MSE), Windows Defender, or another reputable anti-malware program to perform a full system scan. However, it’s important to note that malware often hides itself deep within your operating system. So, it’s possible that some programs won’t detect it. To avoid missing something crucial, we recommend running a complete scan.
The most common reason why people encounter problems with their computers is that they don’t take care of their devices properly. They fail to keep their systems up to date with security patches and virus definitions. Also, many people neglect to regularly backup their data. These things can lead to serious issues down the road.
To make sure that you’re taking good care of your device, here are some tips to follow:
- Make sure that you update your operating system and applications regularly.
- Back up your data every week. Don’t wait until there’s a problem to do so.
- Keep your operating system and apps updated.
Clear or Restore the Power Plans
- Open “Command Prompt” in elevated mode.
- Type the following command and press enter.
- powercfg -RestoreDefaults.
- Create New Power Plan under Power options.
Reset power plans to the default setting
- Open Command Prompt in elevated mode.
- Right-click on the Windows icon in the taskbar and select “Run As Administrator”.
- Type the following command: powercfg –restoredefaultschemes
- In the left pane, under Choose what closing the lid does, choose Change plan settings.
- Under What happens when I close my laptop/tablet/desktop, choose When the battery is critically low, turn off.
- Click Apply and then Ok.
- Reboot your PC.
Launch the windows repair tool
If you are having trouble installing Microsoft security patches, run the Windows Update troubleshooter. This tool helps identify potential problems and provides solutions. You can use the troubleshooting wizard to fix common issues such as missing or corrupt files, outdated drivers, and incompatible applications.
Here’s how to run the Windows Update troubleshooter on Windows 10:
- Press the Win+R keys together to open the Run window.
- Type wuauclt.exe into the text box and hit Enter key.
- Click the Yes button to launch the troubleshooter.
Note: The Windows Update Troubleshooter doesn’t work for all users. It works only if you have installed updates from Windows Update.
APPROVED: To fix Windows errors, click here.
Frequently Asked Questions
Why does the ‘Your power plan information isn’t available’ error message occur on Windows 10?
This error occurs due to different reasons like:-
- Your device doesn't support certain power schemes.
- There might be no power scheme configured in your PC.
- Your PC is running on battery mode.
- There is no network connection present.
How do I solve the 'your power plan information isn't available' error?
The best way to resolve this issue is by resetting your power plan settings to default. To do this, follow the steps below:
- Open Control Panel.
- Click on Power Options.
- Select Change advanced power settings.
- In the left pane, under What happens when I close the lid, choose Change plan settings.
- Under What happens when I close My Laptop/Tablet/Desktop, choose When battery is Critically Low, Turn Off.
- Click Apply and then OK.
- Reboot your PC.
Why is my power plan information not available on Windows PC?
- You don't meet the minimum system requirements for Windows 10.
- You're using an old version of Windows.
- You've disabled automatic updates.
- You're using a 32-bit operating system.
- You're using hardware that's not compatible with Windows 10.