- Download and install the software.
- It will scan your computer for problems.
- The tool will then fix the issues that were found.
Windows 10 is a great operating system, but it’s not perfect. One of the most common errors that can occur with Windows 10 is the error message ‘the requested resource is in use’. This can be frustrating and difficult to solve, especially if you don’t know what the problem might be!
In this blog article, we will try to solve your problem by looking at the possible causes of this error message and ways to fix it so that ‘the requested resource is in use’ no longer interferes with the use of your PC.
Table of Contents:
What causes the “The requested resource is in use” issue

- Accessing your drive: When the error message “The requested resource is in use” appears on your external connected drive. This means that the drive is busy with another function, such as file transfer.
- Copying a file or folder: If a file or folder is in use, you cannot copy, move, or delete it. When you try to do this, the message “The requested resource is in use. Please wait until the action is complete and try again.
How do I solve the “The requested resource is in use” problem
Remove malware via Windows Defender
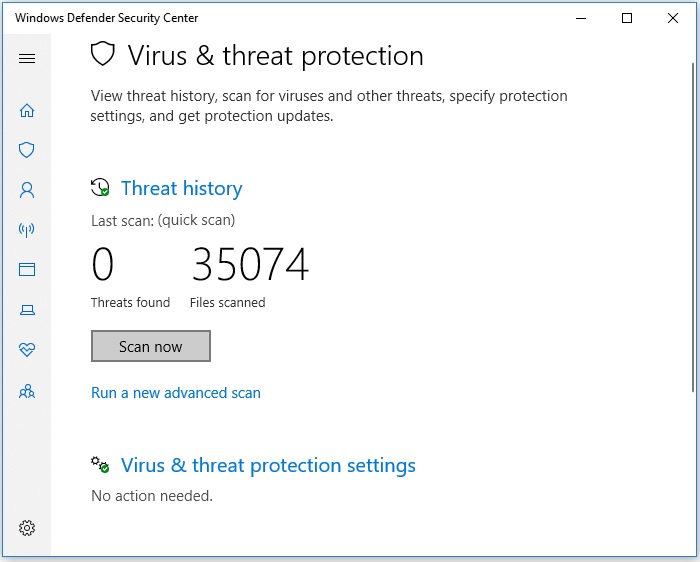
As any computer user knows, malware can be a serious problem. Not only can it damage your files and cause your system to run slowly, but it can also give hackers access to your personal information. Fortunately, there are a number of steps you can take to remove malware from your system, and Windows Defender is one of the most effective tools available. Here’s how to remove malware using Windows Defender on Windows 10:
- Open Windows Defender by clicking the Start button, then selecting “Windows Defender” from the list of options.
- Click the “Settings” button, then select “Administrator” from the list of options.
- In the window that opens, click the “Update & Security” option.
- Under “Windows Defender”, click the “Scan now” button.
- Select the type of scan you want to perform (full or quick), then click the “Scan” button.
- Wait for the scan to complete, then remove any malware that is found by clicking the “Remove selected” button.
- Repeat steps 4-6 as necessary until all malware has been removed from your system.
Updated: April 2025
This tool is highly recommended to help you fix your error. Plus, this tool offers protection against file loss, malware, and hardware failures, and optimizes your device for maximum performance. If you already have a problem with your computer, this software can help you fix it and prevent other problems from recurring:
- Step 1 : Install the PC Repair and Optimizer Tool. (Windows 10, 8, 7, XP, Vista).
- Step 2 : Click Start Scan to determine what problems you are experiencing with your computer.
- Step 3 : Click Repair Allto resolve all problems.

Disable Preview Pane
Despite its name, the Preview Pane in File Explorer doesn’t do much in terms of previewing files. In fact, all it does is show you a thumbnail image of the selected file. If that’s not useful to you, here’s how to disable Preview Pane in Windows 10.
- Just open File Explorer and click on the View tab.
- Then, click on the Options button and select ‘Change folder and search options’.
- In the Folder Options window that opens, go to the View tab and uncheck the box next to the Preview pane.
- Click OK to save your changes and close the window.
That’s all there is to it! Now you’ll no longer see previews of files in File Explorer.
Use system restore
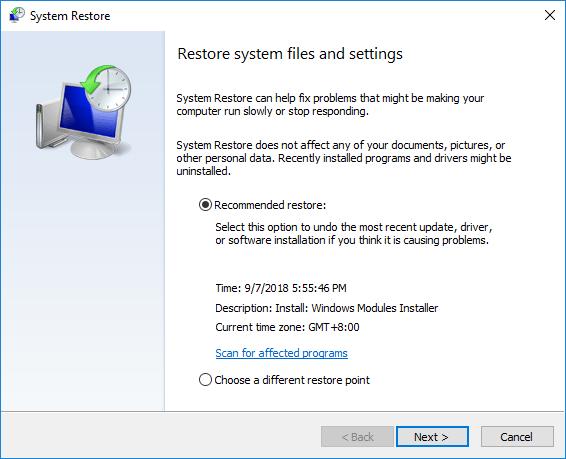
System Restore is a valuable tool that can be used to roll back changes to your computer, including installed programs and drivers, as well as Windows system files. If you’re having problems with your PC, a System Restore can often fix the issue without affecting your personal files. Here’s how to perform a System Restore on Windows 10:
- To perform a System Restore, open the Start menu and type “Restore.”
- Click the first result to open the Restoration Wizard window.
- Select the restore point you created and click “Next.”
- Click “Finish” to confirm and begin the restore process.
- Once the restoration is complete, restart your computer if prompted.
Follow these steps and you’ll be able to use System Restore to fix any problems you may be having with your Windows 10 PC.
Restart PC in Safe Mode
Windows 10 offers a variety of different ways to restart your PC in Safe Mode.
Method 1:
- To access Safe Mode, you can hold down the Shift key while clicking the “Restart” option in the Start menu.
- This will open up the Advanced Recovery Options menu, where you can select “Troubleshoot” > “Advanced options” > “Startup Settings.”
- From here, you can click the “Restart” button and your PC will reboot into Safe Mode.
Method 2:
- Alternatively, you can open the Settings app and go to “Update & Security” > “Recovery.”
- Under the “Advanced startup” section, click the “Restart now” button and your PC will reboot into Safe Mode.
- Finally, you can always press F8 while your PC is booting up to access the Advanced Boot Options menu.
- From here, you can use the arrow keys to select “Safe Mode” and hit Enter.
Restarting your PC in Safe Mode is a great way to troubleshoot problems or remove malware.
Run SFC scan
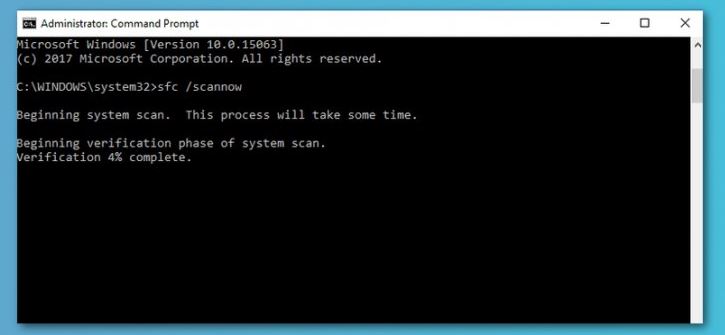
A system file checker is a handy tool that can be used to scan for and repair corrupt files on your Windows 10 computer.
- To use the SFC scan, open the Command Prompt as an administrator.
- In the Command Prompt, type “sfc /scannow” and press Enter.
- The scan will take some time to complete, and you may see some on-screen activity as it progresses.
- Once the scan is finished, you’ll see a message indicating whether or not any problems were found.
- If no problems were found, then you can rest assured that your system is healthy.
- However, if problems were found, then you’ll need to take additional steps to fix them.
For more information on how to use the SFC scan, consult the Windows help documentation.
APPROVED: To fix Windows errors, click here.
Frequently Asked Questions
How do I fix a requested resource is in use?
Since the requested resource is used by File Explorer, you will not be able to copy it. To solve this problem, disable the preview window. Switch to Preview mode, then click Preview Window to disable it. You can also use the ALT + P key combination to toggle the preview window.
How do I fix the error when moving files or folders?
- Format the destination partition as NTFS or exFAT.
- Remove the write protection.
- Unmount the destination disk.
- Change the permissions for files and folders.
- Create a new local user account.
How do I fix the requested resource in use on Windows 10?
- Open the Start menu and type File Explorer.
- In the results, click to open File Explorer.
- Go to the top panel and click Preview.
- Disable the preview window.