- Download and install the software.
- It will scan your computer for problems.
- The tool will then fix the issues that were found.
There are several reasons why you might receive this error message. One reason is that you do not have enough memory resources to process this command. Another reason is that there is something wrong with one of your programs. You can use the following steps to resolve this issue.
If you encounter a problem with “Not enough memory resources are available to process this command,” check out our article about it.
Table of Contents:
What causes a “Not enough memory resources” error?
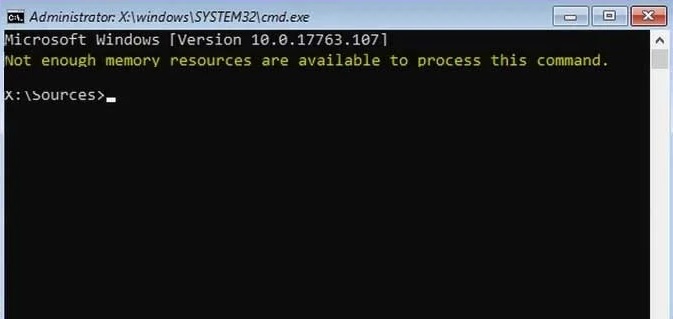
Two common memory problems cause the “not enough resources” error in Windows 10. These errors occur due to improper configuration of the computer hardware or software. If you see such error messages frequently, it might indicate some serious issues with your PC. In this article, we’ll discuss how to fix the issue and prevent it from happening again.
Not enough RAM
This problem occurs because of an insufficient amount of RAM installed in the motherboard. You can quickly identify the issue by checking the BIOS settings. If your computer doesn’t support 64GB DDR4 RAM, it won’t work correctly.
Bad Registry Entries
If you’re facing this issue, make sure that you’ve updated your drivers. Also, try updating the Windows operating system to the latest version. This way, you can avoid further complications.
System File Errors
You may be having an issue with the system files on your hard drive. To solve this problem, you need to repair the damaged registry entries.
Chkdsk should be performed
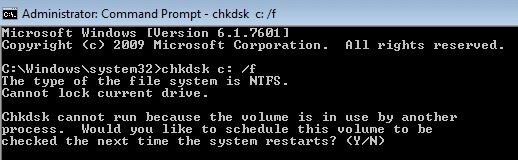
If you are having problems accessing your hard drives, it could be because of a corrupted system file. If you see an error message like “Windows cannot access the specified disk,” try running chkdsk /f to repair the problem. You might also experience issues while trying to install software or games. In such cases, you must perform a clean installation.
The chkdsk utility is used to scan for and fix errors on the hard disk. This tool can repair problems like file system corruption, bad sectors, and missing files. To use it, you must boot into Windows Recovery Environment (WinRE). WinRE is a special mode of operation where you can run commands to check the health of your computer without actually starting up Windows.
If you are prompted to insert a media device, do so, and then press Enter. Once you see the command prompt, type “chkdsk /f c:” replacing “/c:” with the letter corresponding to the location of your primary partition. Press Enter to start the process.
You can also perform the chkdks manually from the command prompt. For example, to check the volume label, type “chkdisk /v.” To check the free space, type “chkfree -f.” To check the MFT, type “fsutil fsinfo ntfsfix c:\”. Type “exit” to exit the command prompt.
Updated: April 2025
This tool is highly recommended to help you fix your error. Plus, this tool offers protection against file loss, malware, and hardware failures, and optimizes your device for maximum performance. If you already have a problem with your computer, this software can help you fix it and prevent other problems from recurring:
- Step 1 : Install the PC Repair and Optimizer Tool. (Windows 10, 8, 7, XP, Vista).
- Step 2 : Click Start Scan to determine what problems you are experiencing with your computer.
- Step 3 : Click Repair Allto resolve all problems.

Use the installation disk to repair Windows Upgrade
Upgrade to Windows 10 is one of the most common problems faced by Windows users. If you are facing issues while upgrading to Windows 10, we recommend downloading the installation disk and repairing the upgrade process. You can download the installation disk here.
The following steps show how to repair Windows upgrade using the installation disk.
1. Open the Command Prompt window
2. Click the Start button, type cmd in the Search box, and press Enter key. A black command prompt window appears.
3. Run the command
4. Type “diskpart” without quotes and press enter key. This opens the Disk Partition Manager.
5. List partitions by typing list disk. The output will look similar to the image below:
6. Select the C: drive by clicking on it.
7. Right-click on the selected drive and select the Repair option.
8. Wait until the process completes.
9. Restart your PC.
Change the SharedSection values
The SharedSection parameter specifies the number of shared sections within the cache pool. A shared section stores data that is used across multiple requests. If you are running out of memory, increase the SharedSection value to reduce the amount of memory required per request. This affects both the client and server caches.
For Windows NT, the SharedValue value should be increased to 512. For Windows 2000, Windows XP, or Windows Server 2003, it should be increased to 2048.
Install the latest version of Microsoft SQL Server
Microsoft recommends updating SQL Server to the latest version whenever possible. This includes patches, hotfixes, and Service Packs.
If you do not update SQL Server regularly, it could become vulnerable to attacks.
The following steps describe how to install the latest version of SQL Server:
1. Download the appropriate installation media for the operating system(s) where you plan to run SQL Server.
2. Run Setup.exe to start the setup wizard.
3. Follow the instructions in the setup wizard to complete the installation process.
4. After installing SQL Server, check the product documentation to see what additional actions must be performed to configure and enable the software.
Temporary folders should be deleted
The Temporary Folder is hidden by design because it contains a lot of configuration files used by Windows sometimes. This folder also stores temporary data such as cookies, cache, and log files. A few things are stored here, including the following:
• Cookies – These are minor information sent to your browser each time you access a site. They allow sites to recognize your computer and provide personalized features. Cookies do not damage your system.
• Cache Files – These are copies of webpages saved locally on your hard disk. When you request a webpage again, the server sends the same file to your computer rather than requesting it over the Internet. This speeds up loading times.
• Log Files – These contain records of what happened while you were browsing the Web. If there is something wrong with your computer, these logs can help identify the problem.
If you want to delete the Temporary Folder, follow these steps:
1. Open File Explorer by pressing Windows + X keys together.
2. Click on the Start button and then click on Computer.
3. Double-click on the C:\Users\username\AppData\Local\Temp folder.
4. Delete all the content inside the Temp folder.
5. Close the window.
Note: You may need to restart your computer after deleting the Temporary Folder.
Change the value of IRPStackSize
To increase the size of the stack, modify the IRPStackSize registry key. You can do this manually or automatically via Group Policy. In addition, some tools automate the process, such as Stack Size Updater.
1. You can use the following command to set the IRPStackSize to 512 KB:
REG ADD “HKCU\Software\Microsoft\Windows NT\CurrentVersion\Winlogon\” /v IRPStackSize /t REG_DWORD /d 0x20000 /f
2. Restart Windows 10
3. Reboot the computer
4. Verify the changes
5. Test it out
APPROVED: To fix Windows errors, click here.