- Download and install the software.
- It will scan your computer for problems.
- The tool will then fix the issues that were found.
Many users complain that they cannot update their system to the latest version of Windows 10, v1903, because the update cannot be installed with error 0x8007000E. The error code “0x8007000E” when upgrading to Windows 10 v1903 usually occurs due to a corrupted downloaded update file or a device or software driver mismatch.
This article provides step-by-step instructions on how to fix the “0x8007000E” error when installing Windows 10 v1903 update: “Update failed. Unable to complete the update. Try rebooting your device, and we will try again.
Table of Contents:
What is a Windows update error 0x8007000e?
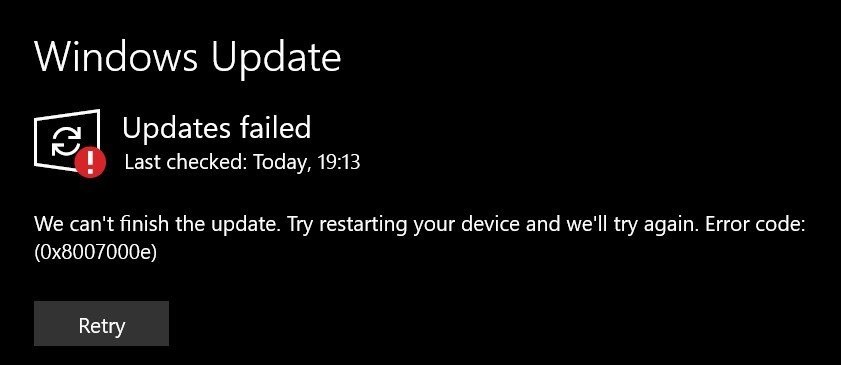
Error 0x8007000e is an update error that shows up when you try to search for new updates via Settings. When the error arises, new Windows 10 updates don’t install.
The first thing to do in this case is to run the Windows Update troubleshooter. It might provide some resolutions for error 0x8007000e.
There are never too many solutions for Windows errors. You can resolve this by following the instructions we provided below.
Start the system file checker tool
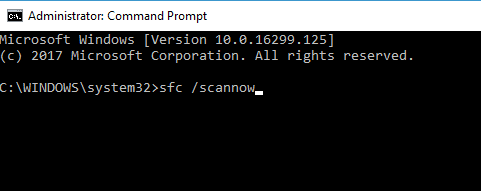
1. Right-Click Start and open the Command prompt (Admin).
2. Type sfc/scannow and press enter. This scans the system files for errors and repairs problems it finds.
3. If there are no errors found, you don’t need to do anything else. However, if there are issues found, follow the instructions below.
4. Click Yes to reboot the computer.
5. When prompted to restart, press ENTER to continue.
6. After rebooting, check for updates again.
Launch the update troubleshooter
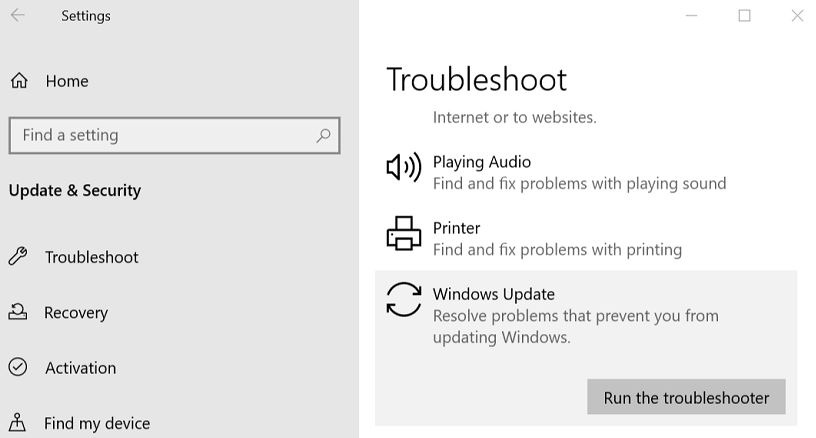
Windows Update troubleshooting can provide some solutions to error 0x8007000e.
1. To perform this troubleshooting, press the Windows + Q key combination.
2. Enter the keyword troubleshoot in the Type here field to search for it.
3. Click Troubleshoot Settings to open the Settings window, as shown below.
4. Select Windows Update and click Troubleshoot.
5. Windows Update may then automatically apply some fixes or suggest some solutions.
6. Follow all of the solutions suggested by the troubleshooter.
Updated: April 2025
This tool is highly recommended to help you fix your error. Plus, this tool offers protection against file loss, malware, and hardware failures, and optimizes your device for maximum performance. If you already have a problem with your computer, this software can help you fix it and prevent other problems from recurring:
- Step 1 : Install the PC Repair and Optimizer Tool. (Windows 10, 8, 7, XP, Vista).
- Step 2 : Click Start Scan to determine what problems you are experiencing with your computer.
- Step 3 : Click Repair Allto resolve all problems.

Changing the name of the SoftwareDistribution folder
1. Select Command Prompt (Admin) and open an elevated prompt window.
2. You’ll want to run this command in the prompt: ren “%SystemRoot%\SoftwareDistribution” “softwaredistribution.OLD.”
3. This will rename the folder from “SoftwareDistribution” to “softwaredistribution.OLD.” If you don’t do this, Windows 10 will automatically restore the old version of the software distribution.
4. The next step is to close the prompt window and reboot the computer.
5. After rebooting, you’ll see the new name “softwaredistribution.OLD.” displayed in the Start menu.
Make use of the Update Assistant
Microsoft has been rolling out Windows 10 build 18092 for weeks now. While it brings many improvements over previous versions, there are still a few bugs here and there. One such bug seems to affect quite a lot of users, especially those running Windows 10 Pro. If you’re one of them, you’ll want to check whether the problem persists after installing the latest cumulative update.
If you’re experiencing errors like “error code 8007000e”, you can download Microsoft’s Windows 10 update assistant tool. This nifty utility makes it easy to install the latest Windows 10 build via a USB stick or DVD. You can even use it to roll back to older builds. Let’s take a look at how to do it.
1. Download the Windows 10 update assistant tool
First, you’ll want to download the Windows 10 update assistant. You can get it from the official website. Once downloaded, extract the contents of the archive using WinRAR or 7zip.
2. Run the Windows 10 update assistant
Once extracted, double-click on the executable file named “updateassistant_v2.exe”. It should launch the program.
3. Choose your installation method
The update assistant allows you to choose between two methods of installation. You can create a bootable media that includes the latest Windows 10 build, or you can simply copy the files to a local hard drive. We’ll be looking at both options.
Ensure that the Windows Update Service is enabled
Windows Update errors are shared among users. If you’re experiencing one, it could mean that the Windows Update service isn’t working correctly. This article will teach you how to fix it.
To check whether the Windows Update service is enabled, follow the steps below.
1. Launch Start Menu.
2. Type services.MSC into the Search box.
3. Click OK to launch the Services app.
4. Right-click the WindowsUpdate service, and select Properties.
5. In the dialog box that opens, make sure Automatic start is checked.
A clean installation of Windows 10 is recommended
Microsoft has announced that it will soon release a tool called Windows 10 Reset Disk that allows you to do a clean install of Windows without losing any personal files or applications installed on your PC. This method requires you to back up everything on your computer before starting the process.
Windows 10 Reset Disk will allow you to reinstall Windows 10 while keeping all your apps and settings intact. You won’t lose anything important like documents, pictures, music, videos, etc. However, you’ll need to make sure that you’ve saved all your files somewhere else because there are no backups during the clean install process.
Once the reset disk tool is ready, Microsoft will roll out an update that will automatically download the tool. If you don’t want to wait for the automatic download, you can manually download the tool from here. Once downloaded, run the tool and select “Reset my PC.”
You’ll see a warning screen telling you about the risks involved in doing a clean install. Click on “I understand the risk,” continue with the clean install and let Windows finish the job. After the clean install completes, you’ll be prompted to restart your PC. When you boot into Windows again, you’ll find yourself with a brand-new copy of Windows 10 installed.
The good news is that the tool doesn’t delete any of your existing programs or settings. So you’ll still be able to use all the same software and apps you had before. If you’re looking to upgrade from Windows 7 or 8.1 to Windows 10, you can read our guide on how to migrate your data from one OS version to the next.
APPROVED: To fix Windows errors, click here.
Frequently Asked Questions
How to solve the problem with error code 0x8007000e?
- Use the update wizard.
- Run the system file checker.
- Rename the SoftwareDistribution folder.
- Check that the Windows Update service is enabled.
What does error code 0x8007000e mean?
Windows 10 v1903 Update error code "0x8007000E" is usually caused by a corrupted downloaded update file or a device or software driver mismatch.
Why does error 0x8007000e occur?
The error code "0x8007000E" on Windows 10 v1903 Update is usually caused by a corrupted downloaded update file or mismatched device or software drivers.