- Download and install the software.
- It will scan your computer for problems.
- The tool will then fix the issues that were found.
If you get the CHKDSK Write Protected message when running CHKDSK, this article will help you fix it.
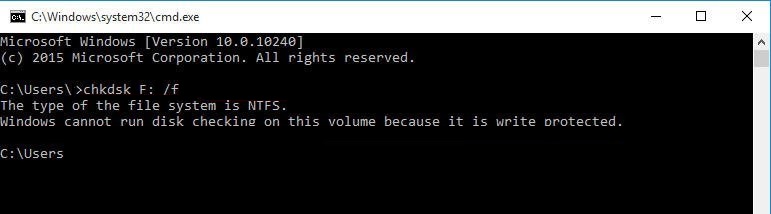
When you use CHKDSK, you may get an alert saying, “Windows cannot perform a system scan on this volume because it has been marked as read-only.”
To understand why the CHKDSK command fails when trying to check the drive, we need to know the reason behind the CHKDSK Write Protected Error.
Table of Contents:
What causes the ‘chkdsk write protected’ error?
The first reason for CHKDCK write-protected error is the drive is read-only. If you are trying to save data to a disk that is write protected, you will receive an error. This happens because the file system cannot be modified while the volume is locked. To resolve this issue, you must unlock the volume.
The second reason for CHKDCKC write-protected error occurs when the drive is damaged or corrupted. When a hard drive becomes damaged, it may become unusable. In some cases, a hard drive may fail to spin up correctly, causing errors. A damaged hard drive may cause problems such as intermittent access.
How to repair the ‘chkdsk write protected’ issue?
Launch CHKDSK
The best option is to run chksdsk /f /rebuild. This will rebuild the index and fix errors. If it finds errors, it will report them. You do not need to run chkdsks /f if you are simply trying to locate the problem area.
You can use the following command to run chkdsl /f /scanvolume to check all volumes.
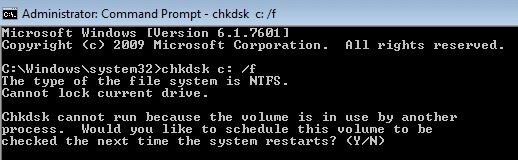
If you see a volume listed as “Unassigned,” it does not mean there is no data on that volume. It could mean that Windows cannot access the volume because another operating system is using it. In this case, you will need to reboot into windows and unmount the volume. Once you are done booting up into windows, you can remount the volume.
Once you have completed scanning and fixing any issues, you can try running chkdsk /r to rebuild the index. This will make sure everything is working correctly.
Updated: April 2025
This tool is highly recommended to help you fix your error. Plus, this tool offers protection against file loss, malware, and hardware failures, and optimizes your device for maximum performance. If you already have a problem with your computer, this software can help you fix it and prevent other problems from recurring:
- Step 1 : Install the PC Repair and Optimizer Tool. (Windows 10, 8, 7, XP, Vista).
- Step 2 : Click Start Scan to determine what problems you are experiencing with your computer.
- Step 3 : Click Repair Allto resolve all problems.

Delete the write protection in Diskpart
If the CHKDSK Write Protected Error is caused by the drive being attributed to Read-only mode, you can use this technique to remove it. This method will clear Read Only attributes. Here are detailed steps and screenshots.
Step 1. Type “diskpart” in the command prompt and press enter.
Step 2. Click on yes in the confirmation dialog box.
Step 3. Type list volume and hit enter.
Step 4. Select the partition containing the corrupted file system and type select part x, where x is the number of the partition.
Step 5. Type clean and hit enter. The process will take some time depending upon the size of the drive.
Step 6. Exit out of the DiskPart window using the exit command.
The partition must be formatted
This method works well if you do not want to lose data while formatting the partition. If you plan to use Windows 10 Home Edition, you must format it manually. You cannot install Windows 10 Pro on this partition.
There are many other ways to format partitions, such as GParted, EASEUS Partition Master, etc., but I recommend using Disk Management because it is simple and easy.
Step 1. Open the Computer window. Click the Start button, type “Computer,” and press Enter key.
Step 2. Right-click the disk where you want to format the partition, select the Format option, and follow the instructions.
Step 3. After formatting, restart the computer.
Step 4. When you start up again, you can see a new partition.
The attribute can be modified via the registry
The Write Protect attribute is used to prevent unauthorized access to data on hard drives and removable media such as USB flash drives. This attribute can be removed by modifying it via the registry.
Step 1. Open the Windows Registry Editor.
Step 2. Press the Windows key and the R key together.
Step 3. Input Regedit into the Windows Cortana search box and click the best match, then select OK.
Step 4. In the Registry Editor, navigate to HKEY_LOCAL_MACHINE\System\MountedDevices.
Step 5. Right-click MountedDevices and select New Dword Value.
Step 6. Type WriteProtectDisable in the Name textbox, then type 0x00000001 in the Data textbox and then click OK.
Step 7. Repeat steps 2–4 for each device you want to modify.
Use third-party tools to check your disk
A third-party tool includes many powerful features such as Disk Checker, Data Recovery Wizard, Clone Drive, etc. However, it does not have some standard functions like partitioning, formatting, defragmenting, etc. If you want to run those functions, you must use other software. Here we show how to do it step by step.
Step 1. Launch the third-party tool. Click “Disk Checking.”
Step 2. Select the target hard disk. Then select the “Check” button.
Step 3. Wait for the process to be completed. You can see detailed information about the disk status.
APPROVED: To fix Windows errors, click here.