- Download and install the software.
- It will scan your computer for problems.
- The tool will then fix the issues that were found.
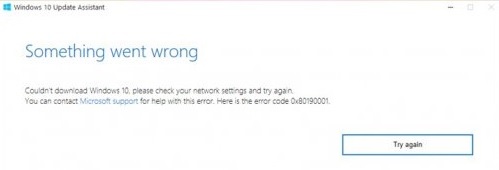
Installing a new Windows 10 update or configuration has many benefits, but it can also be problematic due to error 0x80190001, which prevents the user from downloading files. This is a common problem faced by users due to incompatibility and security issues with drivers.
This error code can result in the following error message: “Something went wrong or an unexpected error occurred while trying to download the files needed for the update.” This article describes some effective remedies to help you resolve this error code. Below are step-by-step instructions on how to fix the error.
Table of Contents:
What causes the error 0x80190001
Before you can fix error 0x80190001, you need to determine what is causing the problem. There are several reasons why this error can occur on a Windows PC. The reasons for this problem are listed below:
- Antivirus interface.
- Damaged system files.
- Incorrect date and time.
- Damaged Windows profiles.
- Not enough free space on the reserved system partition.
Now that we know all the possible causes of error 0x80190001, please try the following solutions below.
How to solve the error 0x80190001
Run the windows update troubleshooter
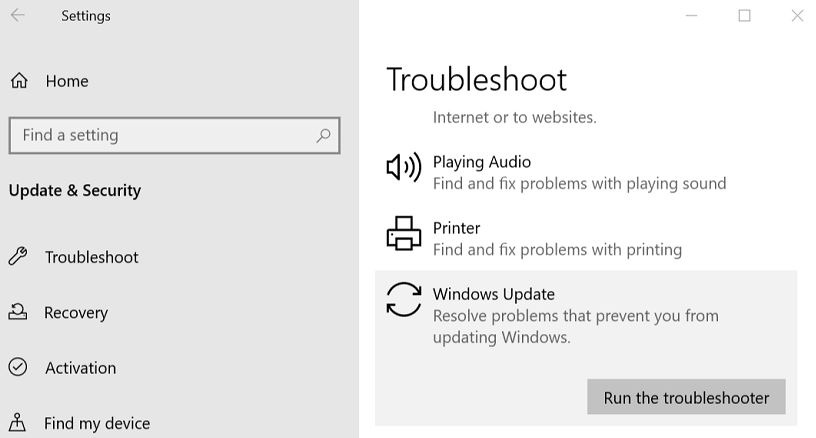
If you’re having trouble with Windows Update, don’t worry – you can use the Windows Update troubleshooter to fix the problem. Here’s a step-by-step guide on how to run the troubleshooter:
- Go to Settings > Update & Security.
- Under the “Troubleshoot” heading, click on “Windows Update.”
- Click on “Run the troubleshooter.”
- The troubleshooter will now scan your system for any problems with Windows Update. If it finds any, it will attempt to fix the problems automatically.
- Once the troubleshooter is finished, restart your computer and try updating again.
Updated: April 2025
This tool is highly recommended to help you fix your error. Plus, this tool offers protection against file loss, malware, and hardware failures, and optimizes your device for maximum performance. If you already have a problem with your computer, this software can help you fix it and prevent other problems from recurring:
- Step 1 : Install the PC Repair and Optimizer Tool. (Windows 10, 8, 7, XP, Vista).
- Step 2 : Click Start Scan to determine what problems you are experiencing with your computer.
- Step 3 : Click Repair Allto resolve all problems.

Launch the SFC scan
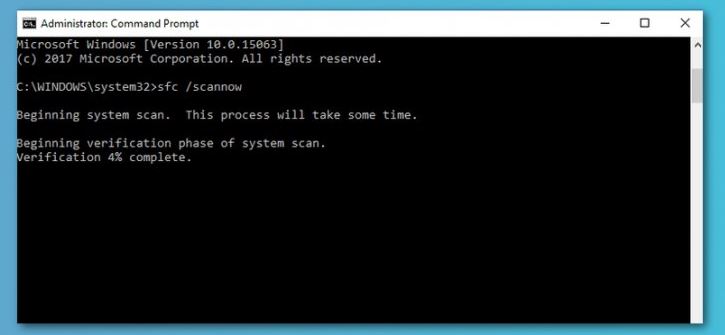
Windows 10 has a built-in tool for scanning and repairing corrupted system files, and it’s called the System File Checker (SFC). The SFC is a command-line utility that can be used to scan all protected system files and replace them with working copies if they are found to be corrupt. Here’s how to run SFC on Windows 10:
- Press the Windows key + X to open the Power User menu, and then click Command Prompt (Admin).
- In the Command Prompt window, type the following command and press Enter: sfc /scannow
- The SFC scan will now start. Depending on the number of files that need to be scanned and repaired, the process can take anywhere from a few minutes to an hour or more.
- Once the scan is complete, restart your computer and try updating again.
Start DISM tool
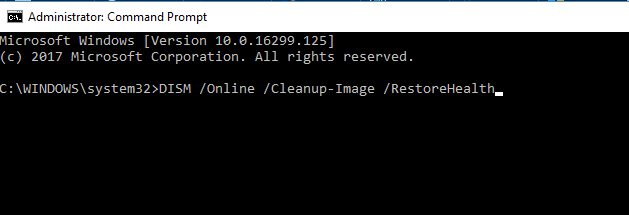
Running the DISM tool on Windows 10 is a relatively simple process that can be completed in just a few steps.
- First, open the Command Prompt by pressing the Windows key + X and then selecting “Command Prompt” from the menu.
- Next, type “DISM.exe /Online /Cleanup-image /Restorehealth” into the Command Prompt and press Enter. The DISM tool will now start scanning your system for errors and attempting to repair them.
- Once the process is complete, you should restart your computer to ensure that all of the changes take effect.
By running the DISM tool on a regular basis, you can help keep your Windows 10 installation healthy and free of errors.
Turn off antivirus
Windows 10 includes a built-in security feature called Windows Defender that helps protect your device from viruses and other malware. In some cases, you may need to temporarily disable this feature, such as when installing new software or running a program that is known to cause issues with Defender. Here are the steps you need to follow to disable Defender on Windows 10:
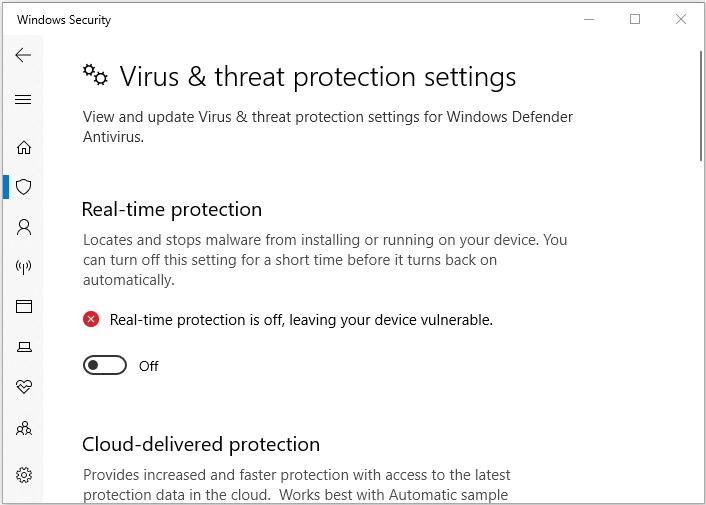
- Open the Windows Defender Security Center. You can do this by searching for “Defender” in the Start menu.
- Click on the “Virus & threat protection” icon.
- Under “Virus & threat protection settings,” click on the “Manage settings” link.
- Toggle the “Real-time protection” switch to “Off.”
- Click on the “Ok” button to save your changes.
These steps will disable Defender’s real-time protection, which is its most important component. Keep in mind that this means your device will be more susceptible to viruses and other malware. Therefore, it’s important to only disable Defender when absolutely necessary and to re-enable it as soon as possible.
Set the time automatically

In order to set the time automatically on Windows 10, follow these steps:
- Go to the Start menu and click on the ‘Settings’ gear icon.
- In the ‘Settings’ window, click on ‘Time & Language’.
- On the left side of the ‘Time & Language’ window, click on ‘Date & time’.
- Under the ‘Set time automatically’ section, toggle the switch to ‘On’.
- Under the ‘Set time zone automatically’ section, toggle the switch to ‘On’.
- Click on the ‘OK’ button to save your changes.
After following these steps, your computer’s clock should now be set to the correct time zone and should update itself automatically when daylight savings time begins or ends.
APPROVED: To fix Windows errors, click here.
Frequently Asked Questions
What is error 0x80190001?
Error 0x80190001 is a Windows 10 specific error code that indicates a problem with the way your computer is connecting to the internet. This can be caused by a number of factors, such as damaged system files, incorrect date and time, or a firewall blocking Windows Update from accessing the internet.
How do I fix error 0x80190001?
There are a few different ways that you can try to fix error 0x80190001 on your Windows 10 computer. These include running the SFC scan tool, using the DISM tool, or turning off your antivirus software temporarily.
Why does error 0x80190001 occur?
Error 0x80190001 can occur for a number of reasons, but most commonly it is caused by damaged system files or a firewall that is blocking Windows Update from accessing the internet.